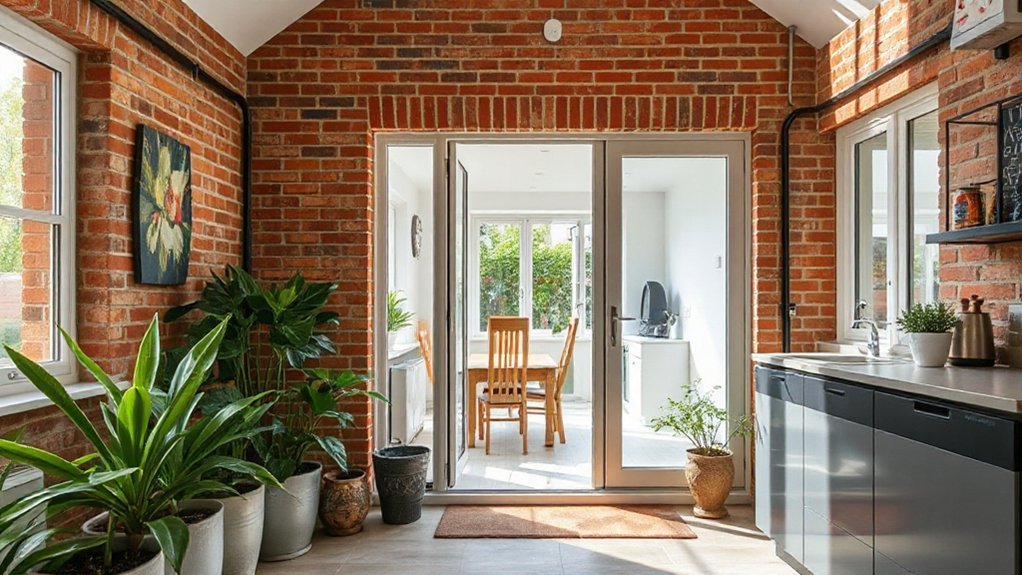
A side return extension can transform a tight yard into a functional, light-filled living space with a clear kitchen-dining hub and cozy lounge zones. Focus on linear layouts, garden-facing windows, and built-in seating to boost daylight and flow while keeping clutter low. Finishes should tie interior and exterior for a cohesive look. The key is balancing practical zones with aesthetic polish—and there’s a smart way to plan the sequence, if you know what to start with.
Key Takeaways
- Prioritize linear, garden-facing layouts that maximize natural light and provide clear indoor-outdoor flow without widening the footprint.
- Align interior and exterior finishes for a cohesive, seamless look—match materials, colors, and rooflines with existing architecture.
- Plan compact storage and built-in seating to reduce clutter while enhancing sitting areas and circulation.
- Integrate a practical utility zone near the back to support kitchen-dining functionality and maintain tidy layouts.
- Consider structural reinforcement early, especially around doors and load shifts, to manage costs and ensure stability.
Why a Side Return Extension Makes Sense for Small Yards
A side return extension makes sense for small yards because it maximizes usable space without widening your footprint. When you plan, you’re choosing efficiency over excess, so you keep circulation clear and avoid awkward bottlenecks.
In Garden landscaping terms, this approach adds square footage without compromising garden access or light. You gain a functional, predictable room that supports practical living and outdoor enjoyment.
Structural reinforcement is a consideration you’ll address early, ensuring the new wing ties into existing walls and foundations with proper support. This strategy prioritizes stability, minimizes disruption, and preserves the yard’s proportion.
It’s a disciplined choice that delivers enhanced layout flexibility, better storage options, and a coherent indoor–outdoor flow, all without expanding your footprint.
How to Assess Your Site: Size, Shape, and Structural Constraints
Begin by measuring your site accurately—record overall size, setbacks, and any easements so you know exactly what you can build.
Note the shape of your yard, any corners, and existing structures to spot constraints that affect layout and access.
Then identify load-bearing walls, foundation depth, and drainage issues early, so you can plan safe, compliant extensions from the start.
Site Size Essentials
How do you quickly gauge your site’s potential? Begin by measuring usable footprint, setbacks, and access routes. You’ll want a clear sense of width, length, and any grade changes that affect construction, drainage, and staging.
Identify fixed constraints—mains, trees, neighboring property lines, and utility corridors—and note how they influence layout options.
Assess structure compatibility: bearing capacity, potential cantilevers, and foundation depth requirements, so you don’t overestimate space or budget.
Prioritize practical adjacencies, like garden privacy buffers and outdoor living zones, ensuring routes flow from existing rooms.
Consider landscape integration from the start: sightlines, shade patterns, and low-maintenance planting zones that won’t distort scale.
Keep your plan lean, loop in utility access, and verify that every foot serves a purpose without overcrowding the site.
Shape and Constraints
- Map the perimeter and record deviations to reveal usable zones and pinch points.
- Evaluate entry widths, solar exposure, and service routes to confirm feasible footprints.
- Prioritize flexible structural options that accommodate future changes without compromising stability.
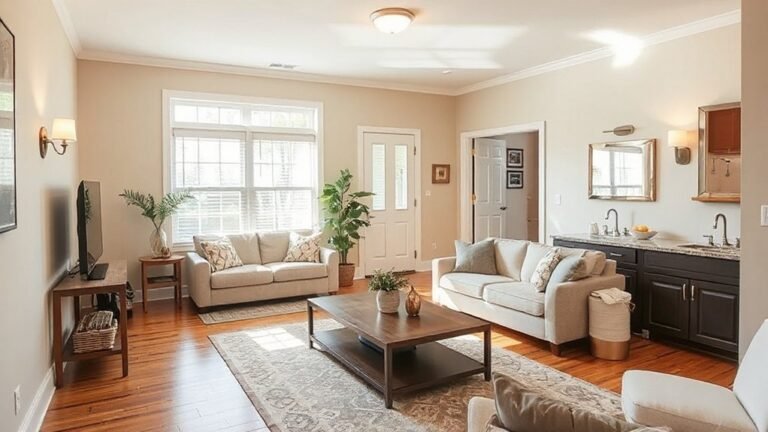
Plan a Seamless Kitchen-Dining Hub Around the Side Return

Start by aligning layout flow with how you move through the space, ensuring the kitchen, dining zone, and entry points form a natural, unobstructed path.
Place appliances for smooth prep and service, prioritizing proximity to counters and the dining area to minimize steps.
Connect the dining zone to the kitchen with sightlines and seating that invites conversation, so the side return reads as a cohesive hub rather than separate rooms.
Layout Flow Harmony
To create a seamless kitchen-dining hub around the side return, start by defining a clear flow that links cooking, prep, and dining without barriers. You’ll measure sightlines, sighting furniture to maintain movement, and place zones with minimal distance between work zones.
Garden privacy and Landscape integration should guide exterior connections, so openings align with greenery and screening elements.
- Establish a continuous path from prep to plating, with zoning that minimizes interruptions.
- Align dining seating to face garden views while preserving accessible circulation.
- Use consistent materials and a restrained palette to unify kitchen, dining, and exterior edges.
This layout promotes efficiency, enhances social interaction, and sustains a cohesive exterior-indoor rhythm.
Appliance Placement Strategy
Efficient appliance placement anchors a seamless kitchen-dining hub around the side return by locating essentials where they support flow, accessibility, and safety. You position the stove, fridge, and prep zones to minimize steps between cooking and serving, aligning them with window lighting and ventilation for comfort.
Group similar tasks in a corridor layout: primary cooking near the sink, secondary prep adjacent, and cleanup within reach of disposal and dishwasher. Prioritize reachable storage so everyday essentials stay at hand, avoiding crowding.
Use tall cabinetry for vertical storage and deep drawers for pots and pans to streamline operations. Integrate storage solutions that keep cords, cords, and small appliances organized yet accessible, reducing clutter.
This approach sustains clear paths and reinforces a confident, efficient kitchen-dining workflow.
Dining Zone Connection
How can you knit the dining zone into a cohesive kitchen-dining hub around the side return?
You design a fluid line between food prep and dining, using a shared surface and consistent materials to unify spaces. Gate the passage with a low-profile threshold and maintain sightlines to garden privacy, so neighbors feel screened yet connected. Prioritize outdoor lighting to extend usability after dusk and to highlight architectural details.
Place the dining table along the return’s length, with seating that faces the kitchen for easy interaction. Use built-in storage and integrated appliances to reduce clutter, and align lighting zones to task, ambient, and accent levels.
- Align materials and finishes across zones for visual continuity
- Position dining for flow, visibility, and garden privacy
- Install layered outdoor lighting to extend usability
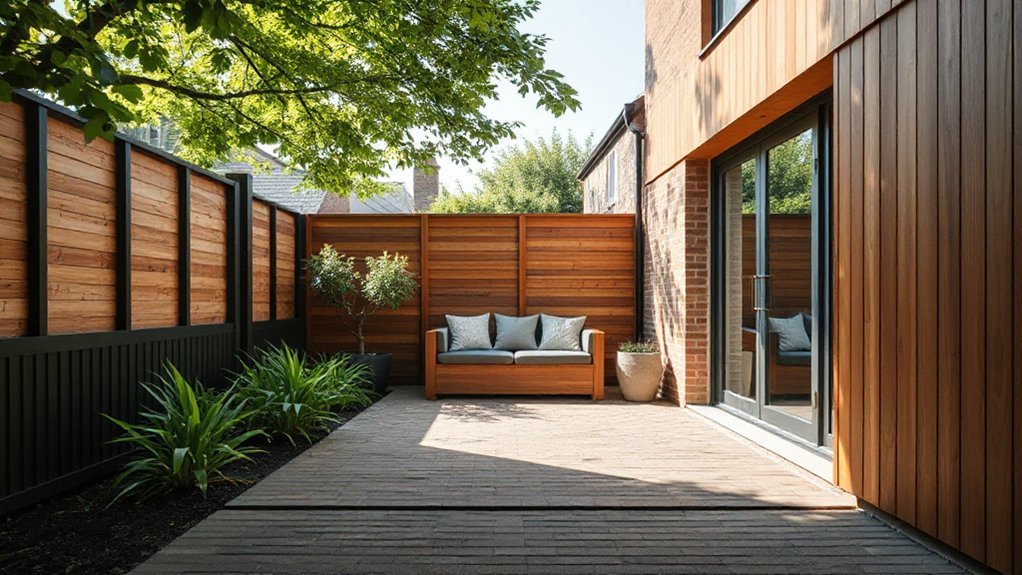
Create Cozy, Low-Profile Lounge Nooks
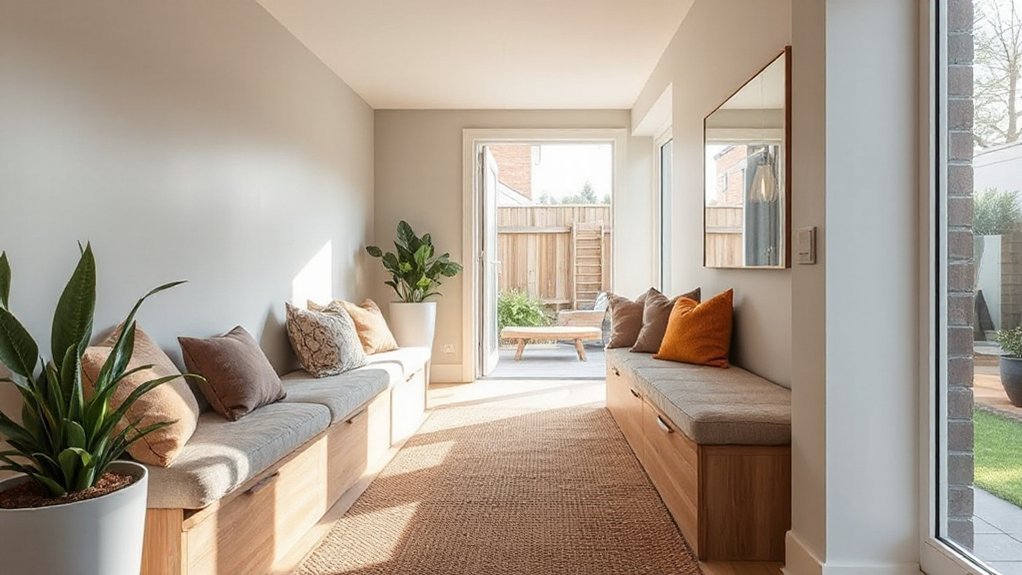
A well-placed, low-profile lounge nook creates a cozy retreat without sacrificing floor space. You design it along the side return with a compact footprint, avoiding bulk while maximizing usability. Choose built-in seating with a slim backrest and hidden storage to keep clutter at bay.
Use a tight, neutral palette and targeted textures—think linen cushions, a wool throw, and a timber rail—so the nook remains calm and inviting. Position lighting above for task and ambience without glare.
Guarantee garden privacy by selecting window treatments that soften exterior views without blocking daylight. Prioritize structural reinforcements in the framing and pin their specs to your plan, confirming load paths and anchoring.
Keep ventilation consistent and access clear for maintenance and seasonal tweaks.
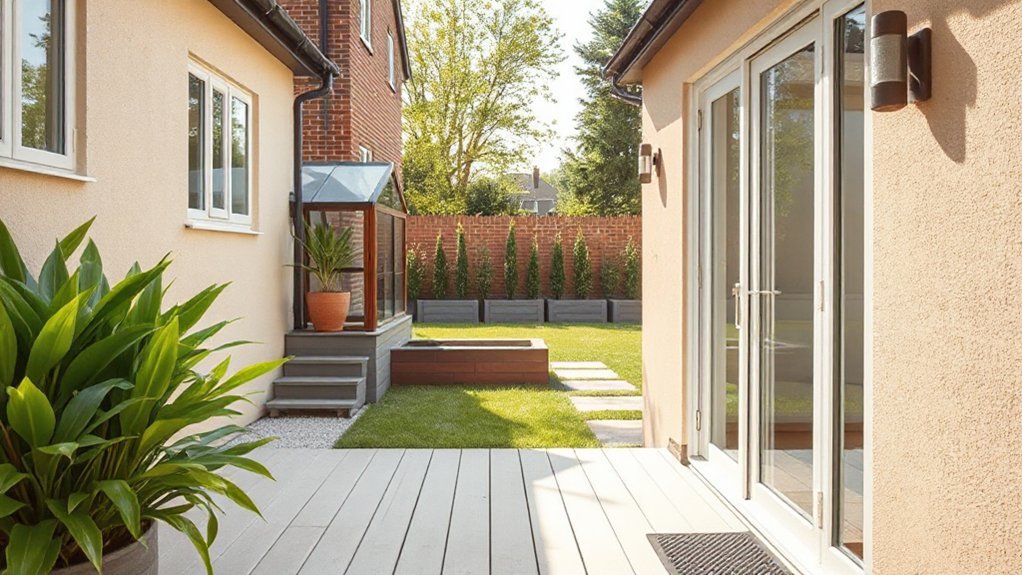
Maximize Daylight and Flow With Smart Windows and Doors
Maximizing daylight and flow starts with smart window and door placement that invites light while guiding movement. You’ll optimize natural lighting by aligning openings with sun paths and interior spaces, creating a coherent flow from living areas to the yard.
Prioritize material selection that minimizes glare and maximizes insulation, while preserving clean sightlines. Choose frames and glazing that balance energy performance with aesthetics, and use operable doors to blur indoor-outdoor boundaries when desired.
- Optimize window placement for cross-ventilation and daylight depth.
- Select low-glare glazing and durable, simple frames for consistent natural lighting and long-term performance.
- Use doors that stack or pocket away to maintain open flow without compromising privacy or efficiency.
Tie Exterior and Interior Finishes Into Your Extension
Select durable, low-maintenance surfaces for the exterior that echo the tactile qualities of interior finishes, ensuring color and grain direction echo each other. Consider cladding, roofing, and window frames in harmony with interior flooring, cabinetry, and wall treatments to support interior harmony.
Use consistent joint lines and detailing—flush thresholds, aligned reveals, and matching profiles—to minimize visual breaks. Prioritize daylight reflection and heat management through finishes that enhance energy performance while preserving a calm, cohesive aesthetic.
Keep accents restrained to reinforce unity.
Match the Design to Your Home’s Character
To match your extension to your home’s character, start by identifying the defining traits of your house—its proportion, roofline, material palette, and ornamentation.
You’ll then align the extension’s details with that character, ensuring architectural harmony and thoughtful material selection. Prioritize cohesive lines, scale, and visible joints so the addition reads as part of the whole, not an afterthought.
- Match roof pitch and eave depth to the existing silhouette
- Use complementary materials and colors to reinforce harmony
- Reflect ornamentation and framing styles in window and door choices
Practical Side Return Layout Patterns (Pros, Cons, Costs)
Side-return extensions come with a few proven layout patterns that balance space, light, and utility. You’ll find that narrow, long rooms benefit from linear layouts with windows along the garden edge, ensuring natural light without sacrificing wall space for storage.
A kitchen-dining sequence near the back can maximize flow, while a compact utility zone reduces clutter in living areas. Pros include increased usable area, stronger value, and flexible front-to-back circulation.
Cons involve potential snag points around doors and the need for careful structural reinforcement, especially where loads shift from original walls. Costs vary by materials and glazing choices, but you’ll gain better curb appeal and functional outside access.
Creative landscaping integrates greenery without compromising structure, while you plan for future maintenance.
Plan, Budget, and Phase Your Side Return Update
Plan and budget for your side return update starts with a clear scope, measurable goals, and a realistic timeline. You’ll define what success looks like, set a budget ceiling, and map phases to avoid scope creep. This approach prevents delays and keeps decisions data-driven.
Consider how landscaping ideas integrate with access, drainage, and light, then assess privacy solutions that don’t compromise flow. Budget contingencies of 10–15% cushion are prudent for permits, utilities, and materials swings.
Phase work to align with weather, trades availability, and landscaping cycles.
- Define scope, goals, and milestones with timeframes
- Allocate costs by trade, with contingency buffers
- Schedule permitting, inspections, and phased landscaping ideas and privacy solutions to minimize disruption
Frequently Asked Questions
How Long Does a Side Return Extension Typically Take to Complete?
A side return extension typically takes about 6 to 12 weeks from planning approval to final completion. You’ll move through design, securing permits, and trades coordination efficiently when you dial in your interior design goals early.
Material selection matters most for timelines, so pick durable, on-budget options promptly. Expect weather and site constraints to influence dates.
You’ll save time by standardizing finishes and sticking to a clear schedule, ensuring you stay on track throughout the construction phase.
What Permits Are Usually Required for a Side Return?
You’ll usually need Building Regulations approval, and depending on your location, Planning permissions may be required for a side return.
Start by checking your local authority’s constraints and whether the work affects light, sound, or drainage.
You’ll likely submit drawings and a structural assessment for Building regulations, while Planning permissions could be needed if it alters the footprint or conservation areas apply.
Don’t assume—confirm requirements before you begin.
Can a Side Return Extend a Kitchen Into a Garden?
Yes, a side return can extend a kitchen into a garden, if you plan around light, access, and drainage.
Garden integration is possible when you preserve functional work zones and create doors or bi-folds to outdoors.
Focus on structural considerations, like load paths, foundations, and potential need for steel beams.
Coordinate with your architect and builder to guarantee soffits, drains, and insulation meet code.
How Can I Minimize Disruption During Construction?
One in four homeowners report project delays due to noise, so you can minimize disruption by planning carefully.
You can cut on-site mess with batch deliveries and dedicated cold-rooms for materials.
You’ll rotate tasks to avoid concurrent noisy activities and use Noise mitigation strategies like acoustic barriers and quiet equipment.
Choose Building material choices that are durable yet easy to install.
Stay communicative with updates, align work windows, and protect adjacent spaces to keep disruption low.
What Are Common Post-Construction Warranty Options?
Warranty coverage varies, but typical options include a one-year workmanship warranty and extended years for structural elements.
You should expect post construction repairs to be covered under the contract for issues arising from installation or materials.
Make certain you obtain written terms detailing what’s included, response times, and exclusions.
If problems appear after completion, notify promptly and leverage the warranty to authorize inspections and necessary post construction repairs.
Keep records of all communications and workmanship certificates.
Conclusion
A side return extension can transform a tight yard into a bright, usable living space. You’ve learned how to assess constraints, position a kitchen-dining hub, and carve cozy lounge pockets that breathe with daylight. By aligning finishes and smart window-door layouts, you’ll fuse indoors and out with practical finesse. Ready to envision the wraparound flow you’ll actually use every day, or is the question lingering like a shadow, inviting you to start planning now?