

Here’s something you might not know: a garage conversion can add usable square footage without expanding your footprint, but it hinges on a precise plan that covers structure, insulation, and egress from day one. If you skip permits or overlook heat loss, you’ll face delays and costly retrofits. You’ll want a clear path from feasibility to finish, with budget buffers and risk checks guiding each decision. Ready to map the details that keep projects on track?
Key Takeaways
- Start with a feasibility check: assess foundation, framing, utilities, egress, insulation, and local code requirements early.
- Plan permits and approvals: identify building, electrical, mechanical permits, and establish timelines with inspections.
- Design for light and privacy: strategically place windows, skylights, and sightlines to balance natural light and privacy.
- Optimize layout and zoning: create functional living zones, efficient circulation, and future-proof electrical and finish plans.
- Budget, schedule, and risk: develop a detailed budget, phased timeline, contingencies, and change-management processes.
What a Garage Conversion Delivers for Your Home
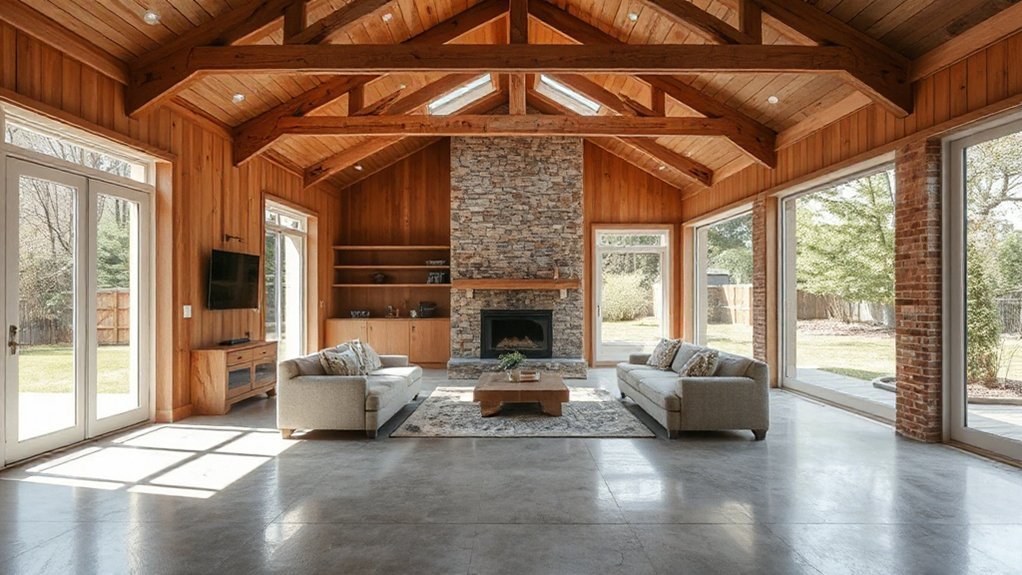
A garage conversion adds usable living space without expanding your building footprint, preserving outdoor access and existing site considerations. You gain a flexible one-story footprint that integrates with your home’s flow, enabling a dedicated workspace, guest suite, or family room without major expansion.
From an efficiency standpoint, you can reconfigure the envelope to optimize insulation, air sealing, and thermal performance, reducing ongoing conditioning costs. The project emphasizes practical finishes and durable materials that support daily use, easy maintenance, and long-term clarity in maintenance schedules.
Garage aesthetics guide surface choices, lighting, and hardware to match adjacent rooms while maintaining energy efficiency. Renovation trends inform layout options, storage solutions, and technology integration to enhance comfort, value, and curb appeal.
Assess Feasibility: Structure, Codes, and Access
Before proceeding with a garage conversion, assess feasibility by evaluating structural integrity, applicable codes, and access constraints to prevent costly revisions later.
You’ll verify foundation stability and overall load paths, identifying any weaknesses that could limit usable space or require reinforcement.
Inspect existing framing, floor elevation, and partition opportunities to guarantee the structure can safely accommodate new elevations, utilities, and finishes.
Cross-check local codes for insulation, egress, emergency exits, and fire resistance, noting any required upgrades without venturing into permit specifics.
Evaluate access for construction equipment and future daily use, including door relocations or hallway access to the main home.
Document constraints, propose targeted mitigations, and quantify impact on budget and schedule, reserving more complex enforcement items for professional consultation when essential.
Permits and Approvals: Get the Green Light
You’ll start by identifying the permit types you’ll need and the associated requirements, including zoning and setbacks that affect your site.
Next, you’ll map out the approval timelines and the step-by-step process for securing permits, plans, and inspections.
Finally, you’ll align construction plans with local codes to anticipate potential hurdles and streamline approvals.
Permit Requirements And Types
Permits and approvals govern garage conversions from the outset, guaranteeing structural integrity, fire safety, and code compliance. You’ll identify required permits, submit plans, and coordinate reviews to avoid delays.
Depending on your locality, expect building permits, electrical permits, and possibly mechanical or plumbing approvals, plus energy efficiency verifications. The process emphasizes documentation, inspection milestones, and clear scope definitions to protect structural support and occupant safety.
Typical fees and turnaround times vary, so plan allowances for contingencies. You’ll also need to confirm accessibility considerations, such as garage access, and verify utility configurations align with code distinctions between new spaces and existing structures.
Start early, track submittals, and maintain organized records for a smooth path to occupancy.
- Identify permit types and required loads
- Schedule inspections and document milestones
- Confirm garage access and structural support compliance
Zoning And Setbacks
Verify lot coverage, height, and parking requirements, ensuring the project conforms to setbacks from all property boundaries and street rights‑of‑way. You must consider neighborhood restrictions that may impose stricter rules than general zoning, including architectural controls or protective covenants.
Prepare a site plan showing setbacks, easements, driveways, and potential impact on sightlines and access. Coordinate with the planning department early, as misinterpretations can trigger redesigns or reapplications.
Document variances or waivers if you need deviations from standard rules.
Approval Timelines And Steps
After you’ve mapped the site and confirmed compliance with setbacks and lot coverage, the next step is to secure the approvals that let the project proceed. You’ll navigate permits, inspectors, and review timelines to minimize delays and guarantee code compliance.
Expect a staged process: plan review, permit issuance, and field inspections. Prepare documentation for structural, electrical, and mechanical systems, plus fire code and energy calculations. Confirm whether your project requires a plan-supporting variance or conditional use approval.
Track submittal deadlines, reviewer notes, and any required revisions to avoid backlogs. Maintain clear records of approvals, amendments, and inspection results to streamline construction and protect your Garage aesthetics and furniture placement.
- Permit milestones and expected review times
- Documentation and revision requirements
- Inspection sequence and acceptance criteria
Insulation and Utilities: Comfort-First Foundations
You’ll assess insulation quality basics to guarantee consistent comfort and energy efficiency across the converted space.
Plan your utilities layout with a focus on practicality, accessibility, and future maintenance, so HVAC, electrical, and plumbing can service the area reliably.
Insulation Quality Basics
Insulation quality is foundational to a comfortable, energy-efficient garage conversion; when you prioritize the right materials and installation, you’ll minimize heat loss and drafts while controlling moisture.
You’ll assess R-values, vapor retarders, and air barriers to balance thermal performance with moisture control. Choose continuous insulation over framing cavities where possible to reduce thermal bridging, and verify that joints are sealed and taped.
Pay attention to moisture sources from the exterior and interior, ensuring the assembly resists condensation and mold risk without compromising ventilation. Use diagnostic testing to confirm uniform coverage and detect gaps early.
- Select high-R continuous insulation and proper vapor retarders for each assembly
- Seal joints, penetrations, and edges to prevent air leakage
- Validate thermal performance with insulation testing and moisture assessments
Utilities Layout Planning
How should you lay out utilities to support a comfort-first garage conversion without compromising energy performance? Begin with a schematic that prioritizes continuous insulation, minimized thermal bridges, and accessible utility raceways.
Plan utility routing to minimize joist cuts, align corridors with future furniture layouts, and locate HVAC, plumbing, and electrical runs away from high-heat areas. Use a single, centralized chase when possible to reduce penetrations and maintain airtightness.
Coordinate electrical placement with lighting needs, outlets, and smart controls, ensuring code-compliant clearances and future expansion space. Label all routes for easy inspection and troubleshooting.
Specify thermal breaks at exterior walls and seal joints to prevent drafts. Verify that ducting and piping respect setback requirements and avoid conflicts with insulation thickness.
Plan the Layout: Flow, Zoning, and Natural Light
A clear layout starts with optimizing flow, zoning, and natural light to maximize usable space and comfort in a garage conversion. You’ll map room flow to minimize dead zones, prioritize primary functions, and guarantee access paths stay clear of fixtures and doors.
Zoning separates public and private areas, controls acoustics, and guides HVAC placement. Natural lighting is positioned to reduce artificial demand while maintaining privacy; arrange windows, skylights, and light wells to balance glare and heat gain.
Consider sightlines from entry and seating areas to improve perceived space and safety. Plan for future flexibility, electrical needs, and code considerations.
- Optimize room flow with defined living zones and clear pathways
- Align zoning with privacy, accessibility, and service routes
- Strategically place natural lighting to enhance comfort and efficiency
Budget and Phasing: Costs, Schedule, and Contingencies
Establish a detailed budget and phased timeline upfront, then track variances as work progresses. You’ll anchor cost analysis to clear line items: structure, insulation, electrical, plumbing, finishes, and permitting.
Build a work breakdown structure that ties each phase to deliverables, milestones, and required approvals, so you can monitor progress objectively.
Reserve a contingency budget category—typically 5–15% depending on scope and site risk—to absorb unforeseen issues without derailing the project.
Schedule sequencing to optimize trades, minimize downtime, and align with utility shutoffs and inspections.
Use monthly cost reports and variance analysis to identify drift early, then reforecast accurately.
Document change orders, impact on timeline, and updated cash flow.
Incorporate contingency planning to sustain momentum through contingencies without compromising quality.
Real-World Examples, Pitfalls, and Quick Fixes
Real-world garage conversions reveal that small decisions early on drive big outcomes: airtight framing, precise electrical layouts, and consistent finish details prevent costly rework later. You’ll see real cases where decorative accents and furniture placement determine perceived space and flow, not just square footage.
Learn from missteps: improper insulation gaps, mismatched ceiling heights, and routing conflicts create delays and adaptations. Quick fixes include modular partitions, hidden junctions, and repeatable trim profiles that minimize disturbance during midstream updates.
Documented examples show that planning for future furniture needs—stream sizes, outlet density, and lighting zoning—avoids retrospective rewrites. Apply these patterns to maintain airtight workmanship, durable surfaces, and cohesive style.
- Consider decorative accents early to guide materials and mood
- Plan furniture placement to align with traffic and alcoves
- Use quick-fix joints and modular finishes for rapid corrections
Frequently Asked Questions
How Will a Garage Conversion Impact Resale Value and Market Appeal?
A garage conversion can boost resale value and market appeal, especially if it adds usable living space with proper insulation and finishes. It often raises property valuation by expanding features buyers seek, improving square footage, and offering flexible use.
To maximize impact, guarantee style, plumbing, and electrical meet code. Market attractiveness rises when the conversion looks integrated with the home.
Consider local demand and comps, as favorable property valuation and market attractiveness hinge on quality presentation and perceived utility.
What Hidden Costs Commonly Appear During the Conversion Process?
“Expect the unexpected.” Hidden expenses typically surface during a garage conversion, from structural upgrades to electrical and insulation tweaks.
You’ll face permit surprises, possible moisture remediation, HVAC shifts, and foundation checks that eat into budgets.
Budget for design fees, surveying, drainage work, and permit expedites.
You should track change orders closely, verify insulation and vapor barrier specs, and anticipate contingency costs of 10–20% to keep the project on track.
Stay proactive, document everything, and communicate with trades.
Can a Conversion Affect HOA Rules or Neighborhood Covenants?
Yes, a conversion can affect HOA rules and neighborhood covenants. You should check HOA restrictions and neighborhood covenants before you start.
Your plans might require approvals or trigger compliance with setback, parking, and use restrictions. You’ll need to review governing documents, obtain required signatures, and document any deviations.
Contact the HOA or a local attorney if terms are unclear. Make certain plans align with architectural guidelines to avoid enforcement actions or fines.
How Long Does the Average Garage-To-Living-Space Project Take?
You’re looking at roughly 4–12 weeks from planning to finish, depending on scope. Think of it as a compass: zoning restrictions point your path, permit requirements stamp each milestone, and inspections confirm your bearing.
You should budget time for design, approvals, and potential revisions. If you expedite reviews, expect faster, but guarantee all codes are met.
You’ll gain usable space as frameworks align, utilities settle, and interior finishes reach completion.
Are There Energy-Efficiency Upgrades Worth Prioritizing First?
Yes—prioritize insulation upgrades and window replacements first. You’ll reduce heat loss, trim energy bills, and improve comfort without overhauling systems.
Start with continuous exterior insulation, air-sealing gaps, and high-performance attic/basement joints.
Install energy-efficient windows with low-E coatings and proper flashing to prevent condensation.
Consider radiant barriers if you’re in hot climates.
Seal ductwork, upgrade to a programmable thermostat, and target a tight, well-insulated envelope before finishing interiors.
Conclusion
You’ll gain valuable added space with a well-planned garage conversion, but some hiccups are inevitable. Use prudent budgeting and phased milestones to guard timelines, and treat delays as learning opportunities rather than failures. Prioritize structural checks, code compliance, and insulation details to avoid comfort gaps. Embrace smart layouts that maximize light and flow, while reserving a contingency fund for small refinements. In short, your project quietly rewards thoughtful preparation with lasting, dependable value.


