
You’ll transform a narrow hallway into a cohesive gallery with precise steps: measure the wall, mock layouts with painter’s tape, and pick a slim, uniform frame set. Use a single, unifying palette and plan grids or vertical stacks with even gaps. Add layered lighting to widen the space and spotlight art. Secure mounts firmly and test routes for traffic. It’s a balance of scale, rhythm, and restraint—tools you’ll want to keep handy as you continue the project.
Key Takeaways
- Plan a grid-based layout using a consistent center alignment and uniform mat depths to maximize narrow-wall balance.
- Use slim-profile frames with uniform matting and color-coordinated finishes to reduce visual bulk.
- Measure baseline height, wall width, and door/baseboard clearance; simulate with painter’s tape before hanging.
- Implement layered lighting (ambient, task, accent) with dimmers to enhance artwork without glare.
- Group pieces into modular clusters and adapt spacing to wall contours for cohesive, scalable installation.
Measure Precisely and Plan Your Hallway Gallery

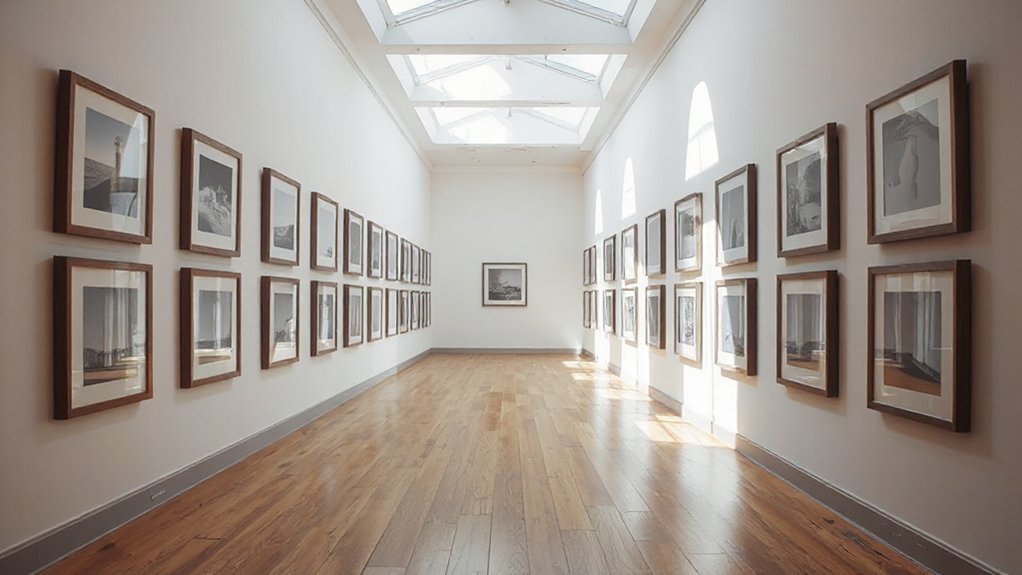
To start your hallway gallery, measure carefully and map out where each piece will sit. You’ll establish a baseline height, typically 57 inches from the floor, and mark it along the wall. Record exact widths, including matting and frames, so you know total wall occupancy.
Use painter’s tape to simulate placement, then step back to assess alignment and spacing. Prioritize vertical consistency: align centers or top edges for a cohesive line.
Note color contrast and wall textures as you plan, ensuring each piece complements adjacent surfaces. Create a simple grid or a virtual layout, then translate measurements to nail positions with a level and a pencil.
Confirm clearance for doors, light switches, and baseboards before mounting. Precision now prevents rework later.
Pick a Cohesive Palette That Unifies the Wall
A cohesive palette unifies the wall by choosing a limited, complementary set of colors that echo or subtly contrast with your hallway’s backdrop. You’ll pick three to five hues that pair well, ensuring you can repeat them across pieces and accents without crowding.
Prioritize color coordination over impulse, aligning warm with warm and cool with cool to maintain harmony. Use a dominant tone to anchor the display, then introduce one or two supporting colors for variation.
Consider the light in the space—north-facing walls read cooler, while south-facing areas read warmer, so adjust saturation accordingly. Keep neutrals in reserve to prevent visual fatigue.
When planning art layering, test combinations on a wall mock-up before hanging, ensuring balance and cohesion.
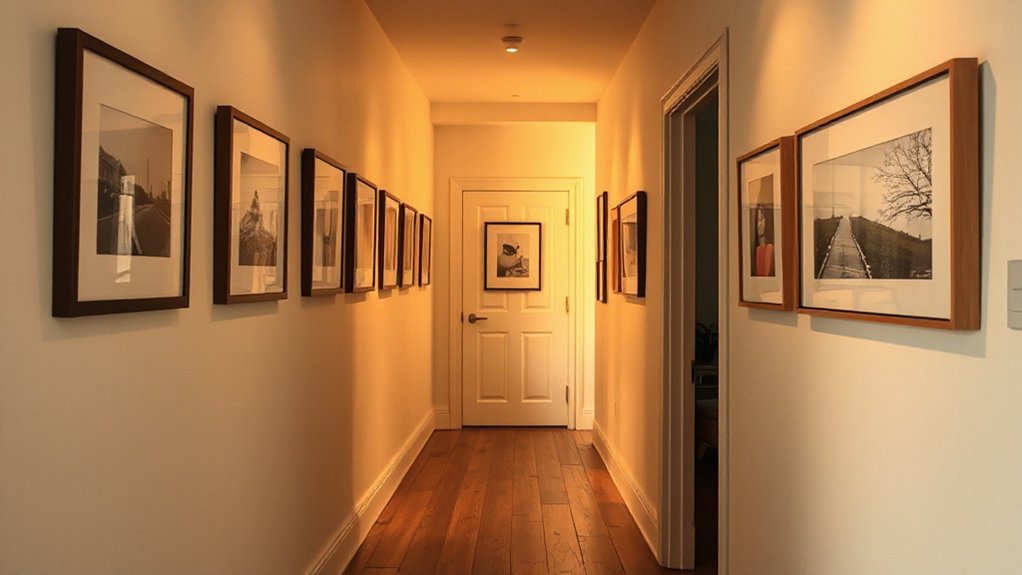
Choose Frames and Mats Suited for a Narrow Corridor
Frames and mats should fit the corridor’s proportions without overpowering or crowding the space. Begin with a compact set of frames that maintain a consistent silhouette, so the eye moves smoothly along the wall.
Favor slim profiles and flat, glass fronts to minimize bulk in a narrow hall. Choose mats that add breathing room; a uniform mat width keeps spacing predictable and gallery-like.
Color coordination matters: align frame finishes with the hallway’s undertone and the artwork’s tones to avoid visual chaos.
For frame selection, prioritize materials with low glare and a clean edge—think black, white, or natural wood in subdued tones.
Confirm mats and frames are sized for the piece, not the wall, to preserve balance and flow.
Design Grids and Vertical Accents for Rhythm
You can establish rhythm in a narrow hallway by using clean design grids and deliberate vertical accents. Establish a grid that aligns frames by centers, not edges, and maintains consistent matting depth.
Build vertical rhythm with tall, narrow pieces or stacked arrays that rise along the wall, guiding the eye upward. Use color blocking to create visual anchors—group hues in rows or columns to unify the sequence.
Employ pattern repetition sparingly: repeat a single motif across several frames to reinforce continuity without overload. Introduce deliberate vertical accents, such as slim vertical sculptures or tall photos, to punctuate progressions and prevent flatness.
Maintain even spacing and alignment to sustain a cohesive flow from end to end.
- Create a grid that aligns centers and mat depths
- Use color blocking to anchor groups
- Repeat one pattern for cohesion
- Add tall vertical accents to punctuate progressions
Light the Wall to Widen the Passage and Highlight Art
To widen a narrow passage and spotlight artwork, plan lighting that emphasizes both wall and pieces without glare. Start with a layered approach: ambient, task, and accent lighting that work in harmony rather than competing.
Choose lighting options that balance brightness along the wall with focused illumination on chosen frames. Use wall washers or adjustable sconces to create even vertical light, preventing hot spots and Easterly glare on glass.
Opt for a consistent color temperature in the 2700–3000K range to keep tones natural. Consider wall color as a design factor: lighter walls reflect more light, while deeper hues absorb it, so adjust intensity accordingly.
Dimmer controls give flexibility without sacrificing clarity or detail in every artwork.
Curate a Balanced Mix of Photos, Prints, and Mementos
Aim for a balanced mix of photos, prints, and mementos so your wall reads cohesive rather than cluttered.
Vary print arrangements by size and orientation to create a steady rhythm, and place meaningful mementos where they’ll be seen at eye level.
Keep the focus on what tells your story, not how much you can fit.
Balanced Photo Mix
A balanced photo mix keeps a narrow hallway from feeling chaotic while still feeling grounding. You curate with intent, pairing images, prints, and mementos so each piece earns its place.
Prioritize color coordination and frame selection to unify disparate elements without dulling personality. Aim for a cohesive palette that supports contrast where needed, not overwhelm it.
Keep scale varied but deliberate, balancing large pieces with smaller keepsakes to guide the eye smoothly down the hall.
- Choose a shared color theme across frames to maintain continuity
- Mix texture: glass, wood, and metal frames for subtle interest
- Integrate a few meaningful mementos at eye level for relatability
- Vary spacing to create rhythm without clutter or dead zones
Varied Print Arrangements
Begin with a core grid of similar sizes, then intersperse a few larger pieces to anchor the display. Alternate vertical and horizontal formats to guide the eye along the wall, keeping spacing consistent at about 2 to 3 inches.
Consider color coordination across pieces; select a unifying palette or a dominant hue to unify mixed content. Choose frame styles that complement the hallway’s hardware and lighting, merging metal, wood, and acrylic accents as needed.
Maintain a deliberate rhythm: repeat motifs, then punctuate with a standout item for focal interest. Adjust as necessary for balance.
Meaningful Mementos Placement
To create a balanced mix of photos, prints, and mementos, place meaningful items where they’ll be seen daily and tell a story of your hallway’s moments. You’ll curate a compact, cohesive display by prioritizing items with personal meaning and high visual contrast, then weaving in variety.
- Prioritize focal pieces: use Personalized wall art as anchor points to draw the eye along the wall.
- Mix scales thoughtfully: pair large prints with small keepsakes for rhythm.
- Group thematically: connect memories by occasion or person to enhance narrative.
- Rotate seasonally: swap items to keep the display fresh and engaging with Creative display ideas.
Hang Securely With Pro Tips and Simple DIY Fixes
You’ll start with secure hanging techniques that keep frames steady without crowding the wall. Use pro-level tools and compatible hardware to prevent slips, and apply level checks as you go.
If a frame needs a quick fix, simple DIY methods restore alignment without delaying the install.
Secure Hanging Techniques
Secure hanging is essential in a narrow hallway, where weight distribution and alignment matter. You’ll choose sturdy hanging hardware and verify stud placement before drilling.
Start with a centered layout, using a level to guarantee straight rows. Distribute weight evenly across supports, staggering frames to avoid overload on a single point.
When in doubt, opt for anchors rated above your total load. Use two-point hang for heavier pieces and single-point for light frames, checking each visually and with a level after hanging.
Regularly inspect cables, hooks, and hooks’ screws for signs of wear. Replace worn components promptly to maintain safety and balance.
- Confirm stud-backed anchors for major pieces
- Use two-point hang for high-weight items
- Check level after each placement
- Inspect hardware and replace worn parts
Pro-Level Tools
With pro-level tools, you’ll sharpen accuracy and speed while hanging in a narrow hallway. Start with a stud finder, laser level, and a cordless drill to establish a precise grid.
Tap into lighting techniques to illuminate the wall evenly, then test for glare and shadow lines before placing hardware.
Use a center-mark method on each frame to ensure consistent spacing, and rely on a level when marking nail positions to prevent tilt.
Keep wall preparation simple: wipe dust, fill small holes, and sand flush so hangers seat cleanly.
Choose quality anchors for plaster or drywall, and predrill to avoid wall damage.
Organize cables and plugs behind art to maintain a clean, professional presentation.
Quick DIY Fixes
If you’re short on time, you can still hang securely by focusing on three essentials: solid anchors, precise measurements, and level placement. Quick DIY fixes keep your hallway cohesive and protected, with immediate results that look intentional.
Use hidden mounting options when possible to preserve a clean line, and choose lighting options that highlight art without glare. Ensure color coordination across frames for a unified feel, even with varied sizes.
Tighten screws to spec and recheck with a level after each addition. Small adjustments now prevent sag later, and you’ll finish with confidence.
- Choose reliable anchors suited to your wall type
- Measure twice, hang once, and verify level
- Test lighting to minimize glare and shadows
- Align frames by color palette and spacing
Troubleshooting for Common Hallway Gallery Challenges
When you’re dealing with a narrow hallway, common gallery challenges often stem from space limits and wall asymmetry, so start by prioritizing layout logic over decoration. Begin with a grid plan that delineates key sightlines and anchor points, then test placements with lightweight templates.
Color coordination matters: keep a cohesive palette to avoid visual chaos and guide the eye along the corridor. Use frame styles deliberately—mix sizes but limit ornamentation to crisp profiles that read as a unified collection.
To fix spacing, group pieces in modular clusters, stepping the grid to match wall contours rather than forcing a perfect rectangle. If a piece dominates, scale it down or swap to a simpler frame.
Reassess lighting, ensuring even illumination across the entire wall.
Frequently Asked Questions
How Tall Should the Gallery Wall Be off the Floor?
You should place the gallery wall about 57 to 60 inches from the floor, roughly eye level for most adults. This height balances accessibility and visual cohesion across varying frame sizes.
Make certain color coordination across pieces and select frame styles that complement your space, not overpower it. Keep spacing consistent, and test with a few lightweight mockups.
If you need more practicality, consider adjusting height slightly for tall ceilings or narrow runs, but maintain a unified look.
What’s the Ideal Spacing Between Frames in a Narrow Hallway?
Aim for 2 to 3 inches between frames in a narrow hallway. This spacing keeps the wall cohesive while preventing clutter.
Maintain color coordination across the pieces to unify the display, and vary frame materials for texture without chaos. Choose complementary finishes (wood with metal accents, for example) to anchor the look.
Keep the centerline at eye level, and adjust if you notice crowding or gaps from lighting. This balance guarantees a polished, gallery-worthy result.
Can You Mix Different Frame Depths Without Crowding?
Yes, you can mix different frame depths without crowding. Start with a consistent layout, then vary depth in small increments (1/4 to 1/2 inch) and stagger edges slightly.
Use Frame styles that feel cohesive, and color coordination to unify the look. Keep mats aligned and image centers level.
Practice a dry run on the floor or wall template, adjust spacing as needed, and guarantee the overall balance remains visually breathable.
How Many Pieces Can Fit in a Standard Hallway Width?
You can fit about 8–12 pieces in a standard hallway width, depending on frame sizes and spacing.
Juxtapose bold and delicate pieces to keep rhythm lively yet calm.
Consider lighting options that highlight depth and color coordination to unify diverse styles.
Keep a consistent matting or border to reduce visual clutter.
Practically measure wall length, subtract margins, and map a grid before hanging.
This disciplined approach guarantees balance, clarity, and an inviting, gallery-like flow.
Do Mirrors Help or Hinder a Narrow Gallery Space?
Yes, mirrors can help in a narrow gallery space. They reflect light, visually widening the hall, and add depth without crowding wall space.
Position them at eye level and flank white or light wall colors to maximize brightness.
Use decorative lighting to highlight artworks and avoid glare.
Choose wall color choices that remain cohesive with the mirror’s frame.
Keep installations tight and balanced to preserve a clear, orderly flow.
Conclusion
With careful planning and precise placement, your hallway gallery will feel spacious and cohesive. Tape the layout first, then hang securely, keeping consistent spacing and a slim frame profile. Use a unified palette and varied yet balanced pieces to anchor the wall. Layer lighting to brighten both art and corridor. If gaps appear, adjust mats or frame positions until everything feels intentional. When in doubt, step back and tweak—you’ll be glad you didn’t rush this one. trust your instincts.


