
8 Ideas for Converting Your Loft Into a Bathroom
Thinking of Converting Your Loft Into A Bathroom? Adding a bathroom to a loft conversion is one of the most significant decisions in the whole project — and one that disproportionately affects both the value of the conversion and how much you will actually use it. A loft bedroom with a dedicated en-suite is a genuinely different product from a loft bedroom that shares a bathroom on the floor below. The former adds significant property value and daily quality of life; the latter is more modest on both counts.
But loft bathrooms come with specific constraints that ground-floor and first-floor bathrooms do not: sloped ceilings that limit headroom over the key sanitaryware positions, structural floor joists that may need strengthening for the additional load, waste pipes that need to be run from a high point in the building to connect with the soil stack or exit point below, and the challenge of finding adequate natural ventilation in what is often the furthest point from any external wall.
The eight ideas below address these constraints while delivering genuinely beautiful and functional loft bathroom spaces — each suited to a different loft configuration, style preference, and budget.
1. The Classic En-Suite: Small Is Enough When Done Well
The most common loft bathroom configuration is a compact en-suite positioned at one end of the converted loft, carved out of what would otherwise be bedroom floor area. The typical footprint is 2–3m², accommodating a shower enclosure, a wall-hung WC, and a wall-hung basin — everything needed, with nothing wasted.
The key to making a small loft en-suite work is the choice of sanitaryware. Standard-depth sanitaryware — a 800mm × 800mm shower tray, a 550mm depth WC, a 500mm basin — requires 2m² minimum clear floor area. Compact sanitaryware designed for small bathrooms (a 700mm × 700mm quadrant shower tray, a 500mm short-projection WC, a 400mm cloakroom basin) can reduce the footprint to 1.5m² while maintaining full usability.
The headroom rule: Position the shower directly under the highest point of the dormer or under the wall plate where headroom is most generous. The 2 metres of headroom required by Building Regulations to classify a room as habitable applies to the main bedroom area; an en-suite can have lower headroom over some areas provided the key standing positions (in front of the basin, in the shower, in front of the WC) have adequate clearance. Discuss with your architect or building control officer what is acceptable for the specific configuration.
Materials: For a compact loft en-suite, large-format tiles (600mm × 300mm or 600mm × 600mm) on both floor and walls create a less busy, more spacious visual effect than small mosaic tiles. A light stone-effect or white ceramic tile throughout — floor to ceiling — makes a 2m² bathroom feel substantially more generous than a bathroom with multiple competing finishes.
2. The Walk-In Shower Under the Eaves
One of the most architecturally satisfying solutions to the loft bathroom’s headroom challenge is to use the lowest part of the eaves — the section where the roof slope reduces headroom to 1.2–1.5 metres — as the shower zone. A walk-in shower with a low or zero-threshold entry, positioned under the sloped ceiling at the eaves, turns the roof’s constraint into an architectural feature.
The shower occupant does not stand where headroom is lowest — they stand at the point of entry, which has full height, while the shower head and the rear wall of the shower recede under the slope. A linear drain at the low end of the shower (under the slope) means the water drains toward the lowest point naturally.
Making it work structurally: The floor in this area needs to be adequately waterproofed and tanked before tiling. The shower drain must be connected to the waste run that exits to the soil stack — in a loft position, this typically requires a pump (a macerator or a dedicated shower pump) where gravity drainage is insufficient.
Making it work visually: A walk-in shower under a vaulted or sloped ceiling can be one of the most characterful bathroom spaces in a house. The sensation of showering under a sloped ceiling, with rainfall from above and the roof angle as a defining element, is genuinely distinctive. Leave the ceiling in the shower area as the sloped soffit rather than boxing it in — it is more interesting architecturally and saves the cost of a horizontal dropped ceiling.
3. A Full Bathroom for Lofts With Dormer Width
Where the loft conversion includes a full-width rear dormer — the most common type of UK loft conversion for Victorian and Edwardian terraces — the full vertical wall of the dormer provides sufficient headroom for a larger bathroom that goes beyond the compact en-suite format.
A full loft bathroom of 4–6m² can accommodate: a bath (if there is space — a 1,600mm × 700mm bath requires a full 2.5m+ in one direction), a separate shower, a vanity unit rather than a wall-hung basin, and storage. This format is appropriate where the loft is being developed as a primary bedroom suite rather than a secondary bedroom, or where it serves the floor below as a family bathroom.
Bath vs shower-only: The decision to include a bath in a loft bathroom is partly a property value decision and partly a practical one. Estate agents consistently note that a house with no bath at all — if all bathrooms are shower-only — is perceived less positively by families with children. If the loft conversion is the only opportunity to retain or add a bath to the property, this is worth considering. If there is already a bath on the floor below, a shower-only loft bathroom is appropriate and more space-efficient.
The dormer window and privacy: A full-width dormer that includes a bathroom needs careful consideration of glazing and privacy. A bathroom window that faces onto a neighbouring roof terrace or an adjacent property’s windows requires obscure glazing. A roof window in the ceiling, or a high-level window set above the sightline of anyone looking from outside, provides natural light without compromising privacy.
4. The Velux Bathroom: Natural Light Without a Dormer
For loft conversions that retain the existing roof profile (Velux-style conversions with rooflights rather than dormers), the bathroom faces a specific challenge: limited wall space and natural light from a roof window directly overhead rather than from a conventional vertical window.
The overhead light from a Velux window in a bathroom is, however, one of the most pleasant lighting experiences in a bathroom space. Showering under a roof window — with daylight coming from above, natural light changing through the day, and (in an electric Velux) the ability to open the window for steam ventilation — is a genuinely desirable experience.
Positioning: The roof window should ideally be positioned over the shower or over the central floor space of the bathroom rather than over the WC. In a narrow Velux bathroom, the window may serve the whole space.
Ventilation in a Velux bathroom: A bathroom without an external wall and with only a roof window must have adequate ventilation to comply with Building Regulations (Part F). An electric opening roof window operated during and after showering provides natural extract ventilation. Where the roof window is fixed (non-opening), a mechanical extract fan vented through the roof structure or through the eaves must be installed.
The electric Velux advantage: In a loft bathroom, an electric or solar-powered opening Velux window is significantly more practical than a manual one. The window can be opened and closed from a wall switch without reaching up to the window handle — relevant when the window is over a wet shower area where reaching is impractical. The rain sensor that automatically closes the window in wet weather is particularly valuable for a bathroom Velux that may be left open for ventilation.
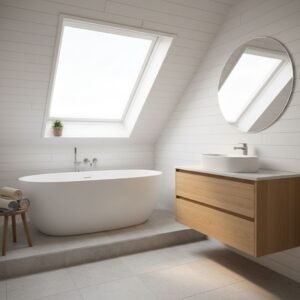
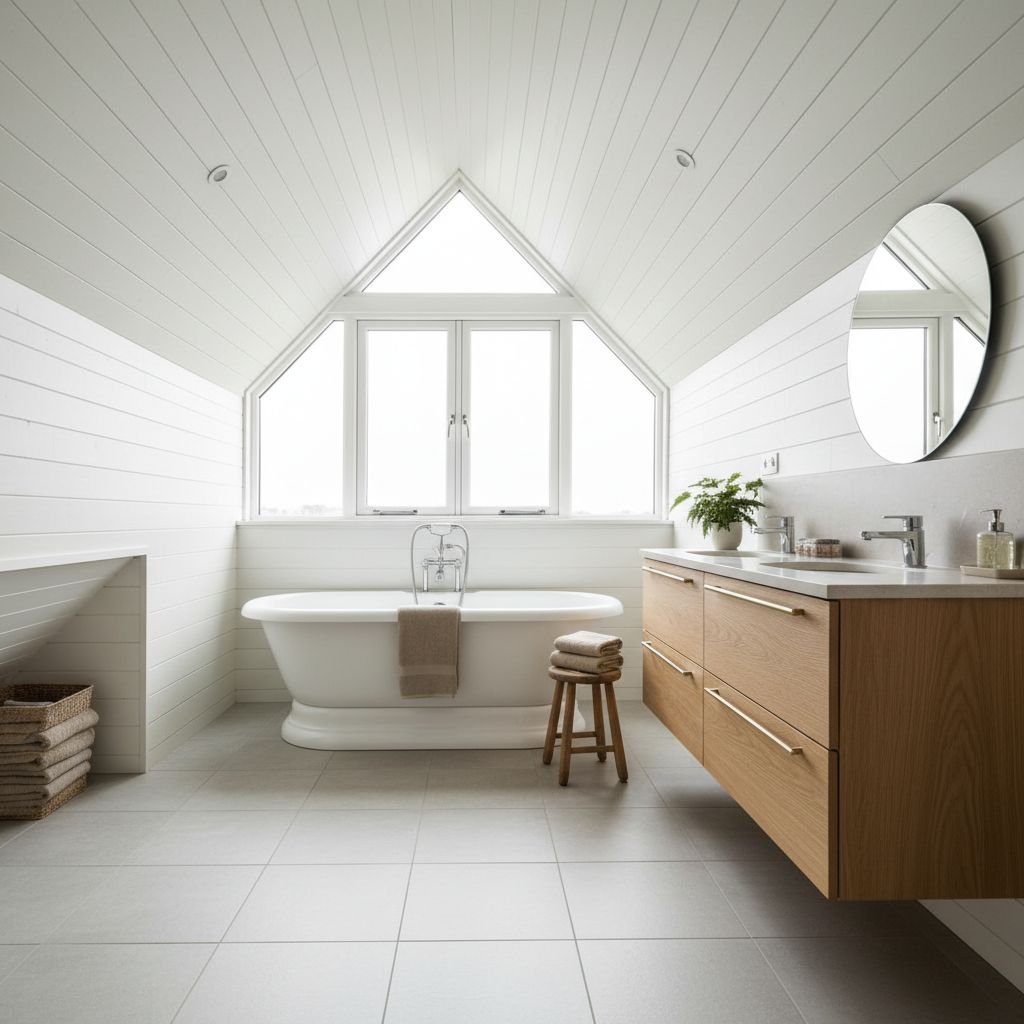
5. The Bespoke Freestanding Bath With a View
For larger loft conversions — those with enough floor area to dedicate a generous bathroom space — a freestanding bath positioned to make the most of the roof window or dormer view is one of the most dramatic and sought-after bathroom configurations available.
The idea: a full-sized freestanding bath (typically 1,700mm × 740mm for a standard roll-top or slipper style) positioned parallel to a rear dormer window, with a view of the sky and rooftops beyond. The bath becomes a destination — not just functional sanitaryware but an architectural focal point of the room, positioned to take advantage of the loft’s most distinctive characteristic: its relationship with the sky.
Structural loading: A freestanding cast-iron bath filled with water and occupied weighs approximately 300–400kg. In a loft conversion, the floor structure must be assessed for this additional point load. The structural engineer involved in the conversion should be asked specifically whether the floor joists can support a freestanding bath at the proposed position, or whether localised joist strengthening is required.
Waste connection: A freestanding bath positioned in the centre of the floor — away from the perimeter walls — requires a waste pipe run beneath the floor to reach the drain outlet. In a loft conversion, this means the floor build-up must accommodate the pipe routing at the design stage, not as an afterthought.
The wow factor: The combination of a beautiful freestanding bath, generous headroom (under the peak of the roof), and a view of the sky through a rear dormer window or a Velux roof window is the loft bathroom’s distinctive contribution to a property. It is the configuration that estate agents consistently cite when selling a property as having a “principal bedroom suite,” and it commands the corresponding premium.
6. The Combined WC/Shower Pod for Maximum Space Efficiency
At the opposite end of the scale from the freestanding bath suite is the bathroom pod — a compact combined wet room or shower room occupying the absolute minimum possible floor area to achieve a functional bathroom.
For loft conversions where the primary objective is to add a bedroom and the bathroom is a requirement rather than a feature, a combined WC and shower room of 1.5–2m² using the “pod” approach — a waterproofed, tiled enclosure with a level-access shower, a short-projection WC, and a cloakroom basin — achieves everything needed with the smallest footprint.
The advantage of this approach is that it frees the maximum floor area for the bedroom itself, which may be the more valuable use of the loft space in a property where bedroom count rather than bathroom quality is the primary driver of value.
Wet room format: A bathroom this compact benefits from the wet room approach — the whole floor of the bathroom is waterproofed and tiled at a fall toward a linear or point drain, rather than a separate shower tray being installed. This eliminates the shower tray upstand (which would take valuable floor space), creates a feeling of more space than the room actually has, and makes cleaning easier.
The Japanese pod approach: For the most space-efficient possible loft bathroom, prefabricated bathroom pods — factory-built, waterproofed, and delivered in a single unit — are available in very small sizes and can be craned into a loft conversion before the roof is closed. While niche, this approach is used in high-density urban developments where space efficiency is paramount.
7. The Copper or Brass Accent Bathroom
This idea is about aesthetic treatment rather than floorplan configuration — and it is worth including because the loft bathroom’s position in the house (at the top, with sloped ceilings and a distinctive relationship with the sky) lends itself to a more adventurous design approach than a ground-floor family bathroom.
The copper or brass accent bathroom uses warm metallic tones — in fittings (basin taps, shower head, towel ring, mirror frame), in fixture finishes (a copper freestanding bath, brass-coloured radiator), or in material (a copper-effect tile or a brass inlay strip at a floor or wall junction) — to create a bathroom that has a distinctive warmth and character.
Why it works in a loft: The loft bathroom’s sloped ceiling, natural overhead light, and often limited window-to-wall ratio create a more intimate, enveloping space than a conventionally proportioned bathroom. Warm metallic accents, combined with stone-effect tiles in warm grey or beige tones, respond naturally to this character — creating a spa-like quality that cooler, all-white bathrooms in the same space often fail to achieve.
Specification: Brass or copper taps and accessories cost more than chrome alternatives but have come down substantially in price as the trend has grown. Brushed brass basin mixer taps are available from £80–£300 at mid-market; brass shower systems from £200–£600. The investment in warm-toned fittings is recoverable in the premium feel of the room.
8. The Plantation Blind and Natural Material Bathroom
The final idea addresses a specific quality that loft bathrooms uniquely offer: the dynamic natural light from overhead glazing. A roof window brings light that changes through the day — raking morning light, bright midday illumination, amber afternoon quality — and the bathroom’s materials can either respond to or fight this characteristic.
Natural materials — untreated oak, honed limestone, warm concrete, brushed plaster — respond to changing daylight in a way that high-gloss ceramics and chrome do not. The grain of an oak floor, the texture of a honed stone wall, and the warmth of a limewash plaster ceiling change character through the day in ways that make the bathroom genuinely interesting to be in at different times.
Practical application: An oak-effect large-format porcelain tile (not solid oak, which does not perform well in wet environments) on the floor, combined with a honed limestone or concrete-effect wall tile, a brushed plaster or micro-cement accent wall, and plantation shutter blinds at any vertical windows — this combination creates a bathroom that is simultaneously practical (all materials are water-resistant and durable) and naturally beautiful in the loft’s characteristic overhead light.
The plantation blind: In a loft bathroom with a vertical dormer window, plantation shutters (rather than roller or venetian blinds) provide privacy control, light control, and a visual quality that suits the natural material aesthetic and the eaves-level window position particularly well. They fold back completely to admit full daylight and can be adjusted through their louvres to filter and direct light while maintaining privacy.
Key Technical Considerations for All Loft Bathrooms
Regardless of which of the above ideas is pursued, four technical issues apply to all loft bathroom projects and should be resolved at the design stage:
Soil stack connection: The loft bathroom’s waste pipe must connect to the soil stack — either by gravity (where the fall from waste outlet to stack connection can be maintained at the required minimum of 1:40) or by macerator pump where gravity is insufficient. A macerator pump (such as the Saniflo range) allows a WC and basin to drain upward or horizontally over extended distances and is commonly used in loft conversions where gravity drainage is not possible. Budget £300–£700 for a macerator unit and installation.
Water supply: Hot and cold water supply to the loft bathroom must be adequate. In properties with combination boilers or pressurised hot water systems, extension of the pipework to the loft position is straightforward. In properties with gravity-fed systems (cold tank in the loft), the conversion of the loft to a habitable room with a bathroom may require the cold water tank to be relocated, as the loft space is now occupied. This is a significant piece of work — a pressurised or combination system may need to replace the gravity-fed system, or the tank may need to be relocated to an external housing or a specially constructed cupboard.
Other Things To Consider
Structural floor loading: All sanitaryware, water-filled baths, and users impose loads on the loft floor structure. The structural engineer involved in the conversion must be briefed on the intended bathroom position and the heaviest sanitaryware — particularly if a cast-iron freestanding bath or a large shower enclosure with a thick stone or concrete tray is planned.
Ventilation: Building Regulations (Part F) require bathroom ventilation of 15 litres/second intermittent or 8 litres/second continuous. An opening roof window satisfies this by natural ventilation. A fixed roof window or a fully enclosed en-suite requires a mechanical extract fan — ducted to the external air through the eaves, the soffit, or the roof slope. The duct run should be kept as short as possible to maintain extract efficiency.
The Value of Getting It Right
Loft bathrooms, done well, contribute disproportionately to the value and appeal of a loft conversion. Nationwide Building Society research consistently identifies the bedroom-plus-bathroom combination as the home improvement that generates the largest proportional value uplift — and the loft bathroom is precisely this combination at its most dramatic. Want it more homey, what about adding underfloor heating too?
The eight ideas above represent eight different ways to resolve the loft’s unique constraints in favour of a genuinely distinctive bathroom space. The constraints — the sloped ceiling, the relationship with the sky, the natural overhead light — are not problems to be minimised. They are the loft bathroom’s defining characteristics, and the best designs make them the heart of the space.


