
You can transform your curb in a single weekend with precise, high-impact moves: clean and refresh key elements, add bold color accents, trim and edge landscaping, and layer lighting for safety and ambiance. Focus on quick wins, schedule two two-hour blocks, and stage with cohesive outdoor furniture. Get ready to capture striking before-and-after photos that prove the work, but stay tuned for the step-by-step plan that guides you through each decisive task.
Key Takeaways
- Plan a focused 48-hour action list prioritizing visible fixes like trimming, edging, mulching, and a cohesive two-tone color scheme.
- Refresh exterior surfaces quickly with bold door/shutter colors, repair peeling paint, and seal vulnerable areas for lasting impact.
- Clean and seal entryways, wash siding, brick, or stucco, and ensure driveways/walkways are crack-free for instant curb appeal.
- Elevate the landscape with fresh mulch, clean edges, weeded beds, and strategic lighting to guide the eye toward the entry.
- Stage a cohesive entry by a clear path, mindful furniture and greenery, low-profile lighting, and after-shot photos for comparisons.
Define Your Weekend Curb-Crawl Goal (What to Fix in 48 Hours)
Before you lift a finger, decide exactly what you want to fix in the next 48 hours. You’ll maximize impact by defining a tight scope and measurable outcomes.
Start with a single objective: a visual upgrade that boosts perception from the curb. Map tasks to days, prioritizing fixes that deliver the biggest return.
Prioritize garden enhancement elements that are visible from the street, such as trimming overgrowth, mulching beds, and fresh edging. Pair these with a concise exterior color schemes plan to unify the façade and focal points.
Limit color decisions to two complementary tones to avoid discord. Set success criteria: one- or two-hour fixes, a clean, cohesive look, and a noticeable lift in first impressions.
Execute, assess, and verify results before dusk.
Create an Immediate First Impression Duo: Curb Clean-Up and Quick Detail Fixes
Your next move is to tackle two high-impact tasks that you can complete in a single session: curb clean-up and a quick detail fix.
You’ll create an immediate first impression by removing debris, trimming overgrowth, and restoring clean sight lines along garden pathways.
Then, address quick fixes that signal care: wash fading exterior paint, touch up scuffs, and seal minor cracks around entryways.
Focus on decisive, observable results rather than perfection.
Use a stiff brush and a mild cleaner to brighten hardscape edges; power wash steps if needed, but avoid overdoing it.
Revisit lighting and hardware briefly to ensure consistency with the refreshed surface.
In one session, you deliver a sharp, cohesive curb appeal that invites a closer look.
Prioritize High-Impact, Low-Downtime Weekend Tasks
Focus on High-Impact Weekend Tasks that deliver visible curb appeal with minimal downtime.
Prioritize Low-Downtime Projects first, so you quick-win your exterior improvements without halting your weekend.
You’ll set a disciplined plan that maximizes results fast and keeps maintenance manageable.
High-Impact Weekend Tasks
To maximize curb appeal quickly, tackle high-impact, low-downtime weekend tasks that deliver visible results with minimal disruption. You’ll prioritize actions that yield noticeable gains without derailing your weekend.
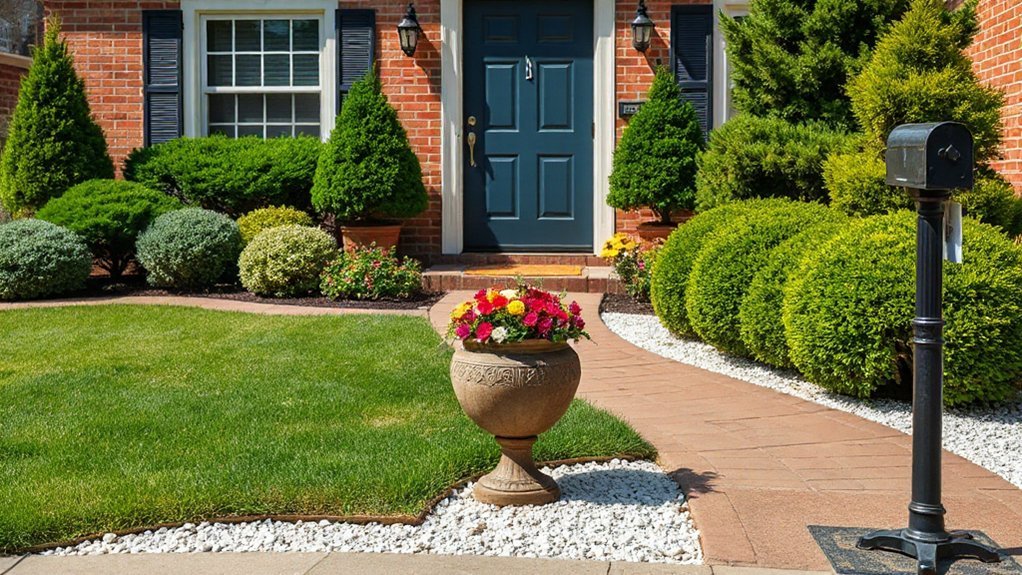
Begin with fresh mulch or soil amendments in beds to sharpen color contrast and reduce weed growth within hours. Refresh landscape borders with clean edging; the crisp line dramatically enhances overall structure.
Address driveway repairs if you spot cracks or pitting, patching or sealing to immediately improve first impressions.
Elevate entry points by updating a fresh mailbox, address plaque, or lighting glare near the door—these tiny cues matter.
Add garden decor accents, like a seasonal planter or a weatherproof statue, to frame focal points.
Complete tasks efficiently, document changes, and reserve time for quick inspection and touch-ups.
Low-Downtime Projects Prioritized
Start with the high-impact, low-downtime tasks that move the needle fast. You’ll prioritize tasks you can complete in a weekend yet deliver visible results.
Begin with quick landscaping design tweaks: prune overgrowth, define clean sightlines, and install fresh mulch to sharpen borders. These steps create immediate curb appeal without disrupting routines.
Next, seal or refresh exterior materials where you’ll gain the most impact with minimal effort—pressure-wash siding, brick, or stucco, and touch up chipped paint.
Focus on strategic improvements that don’t require permits or major reconstruction. Skip ornate overhauls; you’re aiming for clean, cohesive, and durable outcomes.
Document progress and reuse existing assets to maximize value. This approach minimizes downtime while delivering a stronger first impression, aligning with practical, high-return improvements.
Paint Tactics to Refresh Without a Full Refinish
A fresh look doesn’t require a full refinish; a few targeted paint tactics can transform curb appeal quickly and affordably. You’ll focus on color contrast to emphasize architectural features and create visual depth without a full overhaul.
Begin with doors, shutters, or trim in a bold, complementary shade that pops against a neutral body color. If you notice paint peeling, address it first—scrape, sand, and prime to guarantee a lasting finish. Select high-quality exterior paint and apply in ideal weather to prevent future peeling and color fading.
Use two-coat coverage where needed, especially on high-contrast elements. Limit the palette to three tones to maintain cohesiveness, avoiding busy combinations. Finish with a durable sealer on vulnerable surfaces for longer durability and a refreshed, polished curb presence.
Instant Landscaping Tweaks for Immediate Curb Appeal
Instant landscaping tweaks can deliver dramatic curb impact in hours, not days. You’ll target visible, high-traffic zones first: the approach, entry bed, and near-walk thresholds.
Plant selection should be compact, drought-tolerant, and seasonal for quick color shifts without heavy maintenance. Install clean border edging to define beds and reduce lawn spillover, then mulch to unify tones and suppress weeds.
Upgrade a single focal point with sturdy garden furniture that invites pause yet remains weather-ready, anchoring the scene. Introduce a low-profile water feature—think a compact fountain or bubbling urn—to create auditory appeal and a sense of renewal.
Maintain symmetry where possible, trim sightlines, and pressure-wash the entry surface for instant cleanliness. These moves deliver immediate perceived value with minimal disruption.
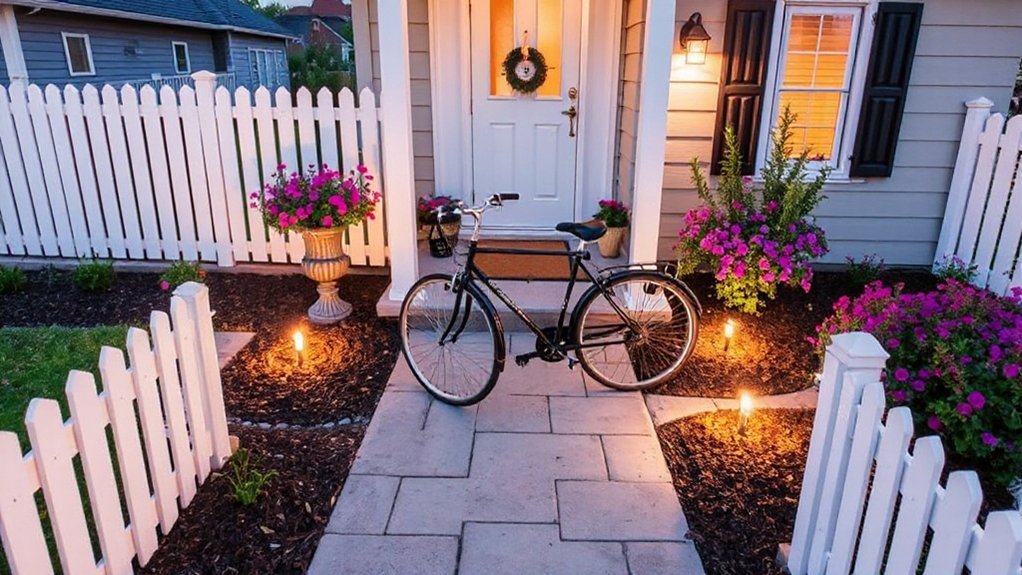
Outdoor Lighting Upgrades for Warmth and Safety
Outdoor lighting upgrades do more than illuminate paths; they create warmth, deter intruders, and extend usable time outdoors. You’ll optimize safety and ambiance by selecting low-glare fixtures, evenly spaced along garden pathways, and layering light levels for depth.
Focus on practical placement near steps, seating, and entrances to guide guests and deter trespassers. Integrate lighting for garden pathways and highlight outdoor sculptures to add focal points without clutter.
Choose brass or black hardware for durability and timeless appeal; use warm color temperatures (2700–3000K) for inviting illumination.
- Layered lighting strategy: ambient, task, and accent levels
- Highlight garden pathways and outdoor sculptures thoughtfully
- Weatherproof fixtures with proper housings
- Timers or smart controls for consistent daily use
Front Door Refresh on a Budget You Can Handle
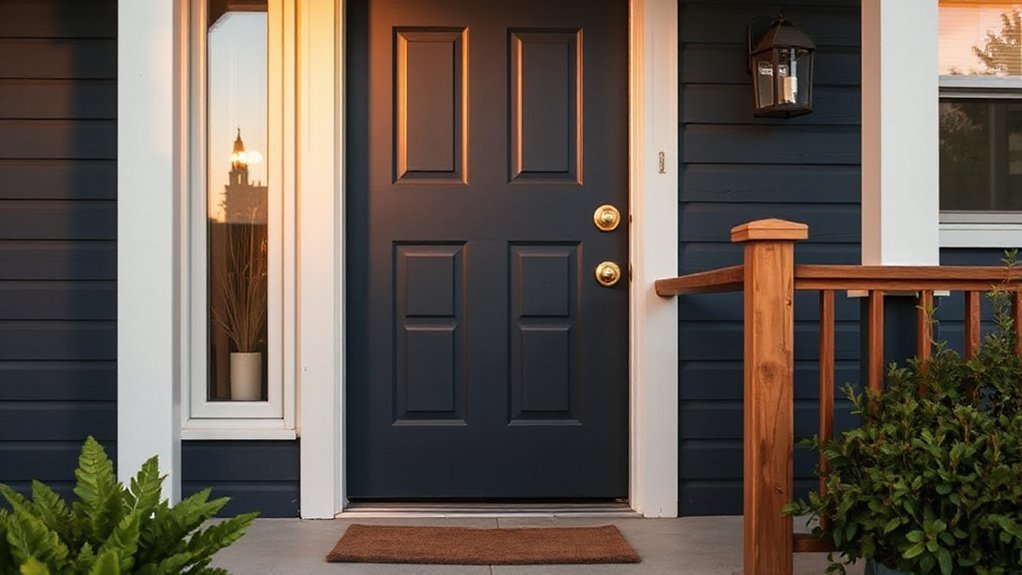
You can transform your entry with a budget-friendly door makeover that delivers noticeable curb appeal. A quick coat of high-contrast paint or a fresh stain adds a bold, lasting impression with minimal cost and effort.
Pair it with reliable hardware and a clear, inviting welcome mat to achieve big impact without breaking the bank.
Budget-Friendly Door Makeover
A front-door refresh doesn’t have to break the bank; with a few targeted updates, you can boost curb appeal fast. You’ll see impact by choosing small, strategic changes that last.
Start with door hardware to upgrade the silhouette and function—swap handles, hinges, or a bold knocker for immediate lift.
Then refresh seasonal decorations for consistent style, aligning color and texture with your home’s exterior. Choose a durable, high-contrast finish that withstands weather.
Clean and seal the door surface to restore vibrancy without repainting.
Finish with a simple, seasonally appropriate mat and plants to frame the entry.
- Update door hardware for function and appeal
- Coordinate seasonal decorations with exterior tones
- Clean, seal, and refresh door surface
- Add an inviting mat and framing greenery
Quick Coat, Big Impact
A quick coat can dramatically elevate your front door without a big budget. You’ll choose a durable exterior paint in a shade that aligns with color psychology, evoking warmth or sophistication while hiding blemishes.
Prep matters: remove hardware, clean surfaces, and seal any cracks to guarantee a smooth finish. Apply a high-quality primer, then two even coats for lasting color and gloss.
Consider curb appeal trends like matte versus satin sheens to balance durability with visibility from the street. Test a small swatch at shoulder height and observe under daylight and shade before committing.
Reinstall hardware with minimal effort, or swap to a fresh, coordinating knocker or house numbers. The result: improved curb presence that invites entry and reinforces neighborhood curb appeal.
Outdoor Staging That Feels Welcoming and Coherent
Curb appeal starts with a cohesive outdoor staging plan that guides visitors from curb to door. You’ll create a clear path, balanced focal points, and inviting moments that signal hospitality and order.
Prioritize garden design that harmonizes color, texture, and scale, so each element supports the next. Choose outdoor furniture that suits the entry rhythm—chairs or a bench at the threshold, a small bistro set on the landing, and a weather-ready table for curbside appeal.
Keep lighting purposeful and low-profile to extend the scene after dark. Guarantee materials and finishes echo the home’s exterior for coherence.
Consistency wins, so repeat shapes, tones, and greenery along the approach.
- Consistent color palette
- Repeated geometric motifs
- Proportional plantings
- Functional seating zones
Maintenance Wins to Prevent Downtime Before Photos
Before you shoot, tackle the maintenance checklist that prevents downtime when photos are scheduled.
Start with landscape planning: confirm landscape beds are weed-free, mulch fresh, and edging crisp to convey immediate curb value.
Inspect exterior signage for legibility, cleanliness, and correct lighting; replace any fading letters or bulbs before the camera rolls.
Check fascia and siding for dirt, stains, or mildew and address with a targeted wash to avoid rework.
Guarantee driveway and walkways are free of cracks, weeds, and trip hazards; seal where needed to preserve photo-ready lines.
Verify irrigation zones function without leaks, trimming overgrowth that could obscure focal points.
Schedule a quick power wash for the primary facade and confirm props are stowed, enhancing overall staging efficiency.
Focus on repeatable, measurable gains.
Two 2-Hour Checklists to Stay on Schedule
Two 2-hour checklists keep you on track and minimize downtime by structuring pre-shoot tasks into focused blocks. You’ll allocate time to align garden layout decisions with exterior materials choices, ensuring consistency before work begins.
Use the first block to verify measurements, zoning, and entry sightlines, then confirm material samples match your envisioned finish.
The second block consolidates staging, lighting, and weather safeguards to prevent delays.
- Define garden layout goals and choose exterior materials that reinforce them
- Validate measurements, permits, and supplier lead times
- Schedule weather windows and backup days
- Assign owners for each task with concrete deadlines
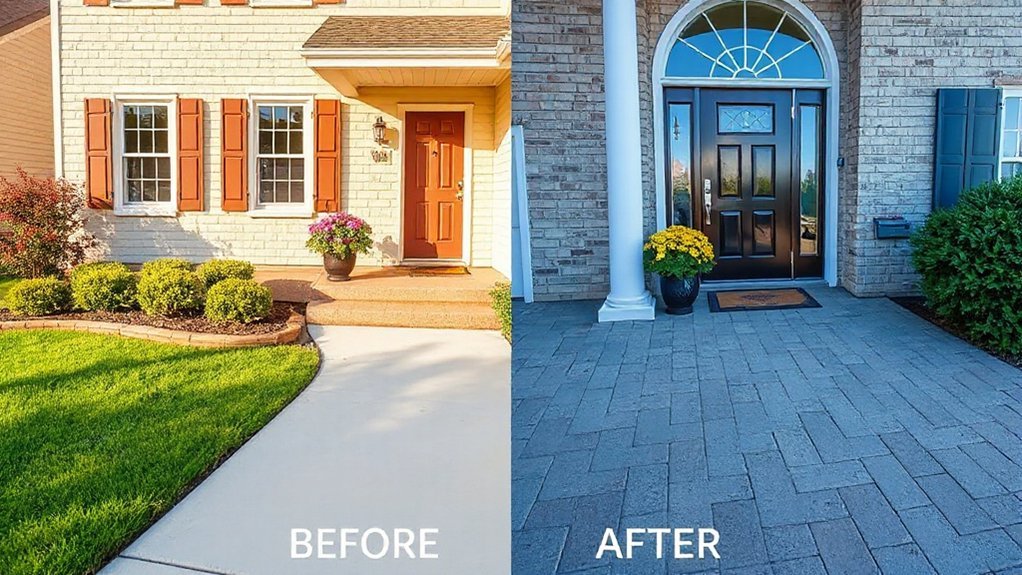
Capture Photo-Ready Proofs and Test Before/After
Capture photo-ready proofs by staging key moments and testing before/after results on site. You’ll document changes with consistent angles, lighting, and timing to guarantee apples-to-apples comparisons.
Start with a baseline shot of the entry, lawn, and fascia, then capture the after shots once improvements are complete. Use photography tips to control shadows, avoid distortion, and highlight texture gains from fresh paint, clean fixtures, and trimmed landscape.
Implement staging techniques like adding seasonal accents or contrasting color pops to enhance curb appeal in the frame. Review images on-site to confirm every element reads clearly and verifies impact.
Produce a concise before/after page, quantify improvements (cost vs. perceived value), and prepare captions that emphasize results for decision-makers.
Frequently Asked Questions
How Long Does a Weekend Curb Appeal Overhaul Typically Take?
You’ll typically finish a weekend curb appeal overhaul in 2 days, tightly scheduled. Plan two full days: one for landscape lighting and porch decor setup, another for touch-ups and pruning.
You’ll spend mornings wiring and testing landscape lighting, evenings styling fresh porch decor, and dedicating downtime for cleanup.
Expect quick wins: improved lighting reach, welcoming entry, and cohesive color accents. If you move quickly, you’ll see results by Sunday night, with minimal disruption to your week.
What Budget-Friendly Fixes Yield the Biggest Impact Quickly?
Your best budget-friendly fixes yield big impact fast: focus on a sharp exterior cleaning and targeted landscaping upgrades.
Start with a thorough exterior cleaning to remove grime and boost curb appeal instantly.
Add simple landscaping upgrades—fresh mulch, edging, and disease-free plantings—to create immediate structure and color.
You’ll maximize impact with concise, durable changes that require minimal cost and effort, delivering a noticeable result that’s easy to maintain.
Can I Reuse Existing Paint or Materials for a Refresh?
Yes, you can reuse existing paint and materials. Do a thorough color and material audit, mix compatible tins to maximize coverage, and test on a small area first.
Embrace paint recycling options where possible, and label colors to avoid waste.
For hardware, reuse hinges, pulls, and trim if condition allows.
This approach emphasizes material reuse, reduces waste, and delivers a refreshed look without new purchases, creating a sharp, cohesive curb appeal.
Which Tasks Should Be Done Indoors vs. Outdoors First?
Start with indoors first: tackle Indoor organization to clear clutter and set a planning base. Then move outdoors, prioritizing outdoor planting to establish instant curb impact.
You should complete wiring, lighting checks, and interior decluttering before weather-influenced tasks. Then plant, mulch, and edge beds once soil is workable.
Coordinate tasks so indoor areas are ready to reveal while outdoor spaces are prepped for quick planting. This sequence maximizes results and minimizes disruptions.
How Can I Photograph Curb Appeal for Before/After Proof?
You should photograph curb appeal by capturing clear before/after shots, framing the entire facade, entry, and yard, with consistent angles. Use a wide lens, steady tripod, and even lighting.
Include garden landscaping and lighting enhancements in both captures, noting exact changes. Shoot at similar times of day, and document measurements and materials.
Use a neutral timeline, then compare, quantify improvements, and publish results with captions that emphasize ROI and visible impact.
Conclusion
You’ll finalize faster, you’ll see bigger gains, and you’ll earn homeowner bragging rights. You’ll define goals, you’ll tackle fixes, you’ll refresh colors, you’ll trim and mulch, you’ll light the path, you’ll stage with purpose, you’ll photograph the result, you’ll compare Before and After, you’ll celebrate momentum, you’ll minimize downtime, you’ll maximize curb appeal, you’ll create inviting spaces, you’ll demonstrate control, you’ll prove that a weekend workplan delivers remarkable perception, durable impact, and confident results.


