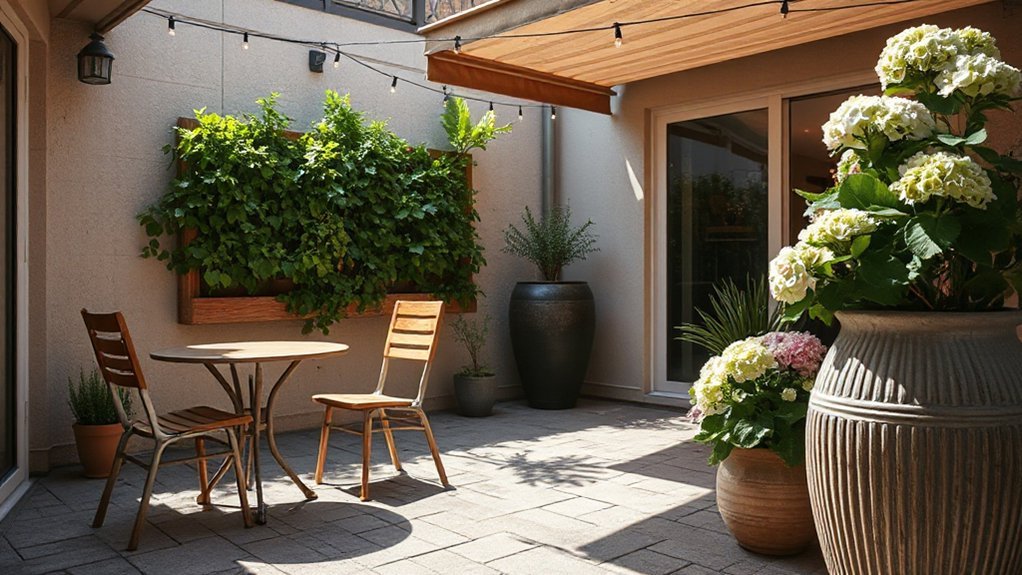
You might not realize how much vertical space can free up a tiny patio when you use hidden benches and vertical planters. You’ll want smart storage first to declutter, then flexible seating and shade that adapt to how you use the space. There’s a method to layering lighting and weatherproof textiles that keeps things comfortable year-round. If you’re curious about creating defined zones without crowding, this approach will point you toward practical, durable upgrades—and it all starts with a solid plan.
Key Takeaways
- Create defined zones with compact, multiuse furniture to maximize seating, dining, and storage in a small patio.
- Use modular and foldable seating plus nesting tables to reconfigure space for guests or daily tasks.
- Add vertical storage and wall-mounted planters to free floor space and boost greenery without crowding.
- Incorporate layered lighting (ambient, task, accent) to extend usability into evenings.
- Combine shade solutions (portable umbrellas and retractable awnings) to maintain comfort across sun exposure.
Start With Smart Storage to Declutter Your Small Patio
Smart storage is your first line of defense against a cluttered patio. You optimize every inch by selecting slim cabinets, weatherproof bins, and stackable totes that tuck under seating or along a wall. Choose pieces with integrated lids and moisture seals to reduce grime and dampness.
Assign zones: a cleaning caddy, a seasonal décor bin, and a toolbox for quick fixes. When you store outdoor art safely, you protect it from sun fading and moisture while keeping surfaces clear for daily tasks.
Earmark vertical space with wall shelves and hooks, freeing floor area for movement. Privacy screens not only shield sightlines but create a tidy backdrop for plants and seating.
Clear clutter, and your patio feels instantly more usable.
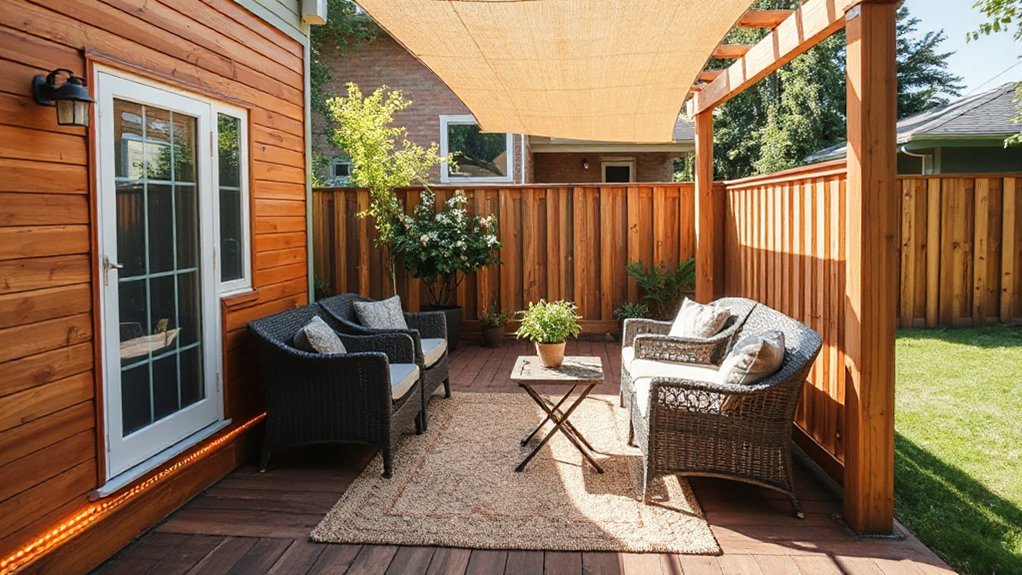
Compact, Flexible Seating for Any Layout
Think about seating you can reconfigure with ease, choosing pieces that shift from lounging to dining in moments. Prioritize flexible options like stackable stools and lightweight benches that nest or fold to reclaim space when not in use.
Consider how each piece snacks into your layout, so you can accommodate solo mornings or gatherings without crowding the patio.
Flexible Seating Configurations
Flexible seating makes small patios truly usable by adapting to the moment. You’ll pair pieces that stack, fold, or slide for instant layout changes, so guests never feel cramped.
Start with a compact dining table that allows 2–4 seats and can convert to a console when not in use.
Use modular chairs that tuck under the table or nest beside potted plants to minimize footprint.
Consider a bench with hidden storage to keep cushions ready without clutter.
Alternate seating heights—a low sofa for lounging, stools for quick meals—to broaden seating arrangements without expanding the footprint.
Prioritize outdoor dining options near entryways to reduce traffic bottlenecks.
Finally, keep a small group of portable chairs handy for impromptu gatherings.
Space-Saving Stool Options
Space-saving stools are a practical, flexible solution for tight patios, ready to adapt to any layout or social moment. You’ll gain seating that’s easy to move, store, and reconfigure without crowding the space. Choose options that balance comfort, durability, and footprint, prioritizing quick setup and reliable stability.
Use folding stools for occasional needs, stackable seats when you anticipate frequent reassembly, and models with non-slip feet for outdoor surfaces. Materials should resist weather and fading, with UV protection and rust-resistant hardware.
Keep a few in reserve for guests, then tuck them under a bench or behind a door. Regular care extends life, so wipe, dry, and store properly after use.
- Folding stools for occasional use
- Stackable seats for versatility
- Lightweight, weather-resistant builds
- Non-slip feet for stability
- Easy storage and quick setup
Shade Solutions for All-Day Outdoor Use
When you’re planning shade for all-day comfort, start by matching protection to sun exposure patterns—morning, noon, and late afternoon—so you get continuous relief without reconfiguring your setup.
For practical all-day use, combine portable umbrellas for flexible, low-profile coverage with stationary options for peak sun windows. Position two portable umbrellas to shadow seating areas during morning and late afternoon, while a retractable awning covers the midday stretch, reducing glare and heat buildup.
Choose UV-rated fabrics and crank or push-button mechanisms for easy adjustments. Confirm tilt angles and rotation allow you to chase shade as the sun moves.
Store lightweight components overnight and in windy weather. This strategic mix delivers durable comfort with minimal disruption to your patio routine.
Layered Lighting for Ambiance and Safety
Layered lighting starts with a plan: map pathways, focal points, and steps, using a mix of ambient, task, and accent layers to cover safety needs and mood.
You’ll balance bright, even fills with softer accents while ensuring practical visibility for entryways and shifts.
We’ll explore the basics, safety implications, and ambiance techniques to shape a patio that feels inviting and secure.
Layered Lighting Basics
Layered lighting for a small patio blends function with mood by combining three layers—ambient, task, and accent—to create a safe, inviting space. You’ll design a usable glow by balancing general illumination, focused work light, and decorative highlights that guide movement and define zones.
Start with low, diffuse ambient sources to set the mood without glare. Add task lights where you cook, grill, or read, ensuring even coverage. Use accent fixtures to emphasize plants, textures, and architectural features, reinforcing color schemes through warm or cool tones.
Plan wiring and controls so you can tailor brightness by time or occasion.
- Ambient sources for overall fill
- Task lights over work zones
- Accent fixtures highlighting texture
- Wall-mounted and surface options
- Dimming controls for flexibility
Safety Through Illumination
Ever wonder how lighting can do more than set the mood? You’ll use layered lighting to guide, deter, and reassure. Start with path lighting to illuminate walkways and edges, reducing tripping hazards after dusk.
Add task lighting near entry doors and seating areas so you can read labels, prepare drinks, or chat without leaning over shadows.
Implement solar powered fixtures along steps or low walls for reliable, eco-friendly safety boosts, especially on overcast days.
Combine with motion activated lighting at entries and *passage*—these respond to presence, deterring intruders and saving energy.
Keep controls simple: place a single switch for all-night comfort, plus sensors that trigger only outside permitted hours.
Review placement quarterly, tightening beams to avoid glare and unnecessary illumination.
Ambiance Creating Techniques
Ambiance starts with a deliberate mix of light sources that work together rather than in isolation. You’ll layer illumination to guide, highlight, and soften without glare, balancing function with mood. Focus on sightlines, texture, and safe paths, then add scent and sound for immersion.
- Use warm outdoor-rated LEDs at steps, seating, and artwork for visual cueing.
- Install dimmers or smart bulbs to shift intensity by activity and time.
- Add low-profile path lights to define edges without overpowering features.
- Integrate subtle string or uplighting to create depth and ambiance.
- Pair lighting with optional aromatherapy scents and subdued outdoor acoustics for cohesion.
This approach preserves clarity, enhances safety, and elevates patios tactically.
Weatherproof Textiles That Last Season to Season

When selecting cushions, go with removable, washable covers and plan for quick rinses after rain or spills. Establish a routine: wipe weekly, inspect stitching monthly, and store during harsh seasons in breathable bags. Weatherproof textiles perform best when you rotate uses and avoid prolonged moisture.
Maintain color and integrity by air-drying, avoiding heat driers, and resealing fabric coatings as recommended by manufacturers. Your setup stays inviting, year after year.
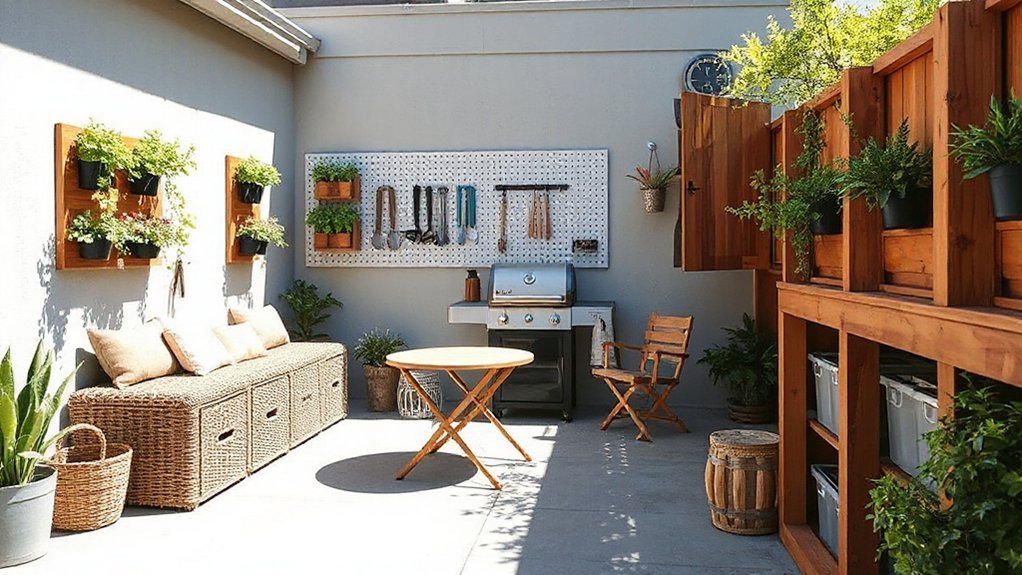
Space-Saving Furniture That Maximizes Small Patios
If you’re maximizing a tight outdoor space, choosing compact, multifunctional furniture can dramatically expand how you use a small patio. You’ll prioritize pieces that stack, fold, or nest, letting you reclaim floor area for guests or a tiny outdoor dining setup.
Focus on durable materials, watertight finishes, and simple silhouettes that won’t overwhelm the space. Pair space-saving chairs with a slim table that can extend, then tuck everything away when not in use.
- Modular seating that rearranges for guests
- Nesting or folding tables for flexible outdoor dining
- Upright storage benches with hidden compartments
- Slim, weatherproof dining sets that maximize footprint
- Decorative accents that unify the look without crowding
Choose color, texture, and scale carefully to keep the area open and inviting.
Greenery That Grows Up Without Crowding
Explore vertical greenery options that fit a small footprint, so you maximize wall space without crowding. Consider tall yet compact plants and trellis tomato techniques to lift growth upward while keeping paths clear and maintenance simple.
Vertical Greenery Options
Vertical greenery that climbs rather than crowds is the smart way to add lush dimension to a compact patio. You’ll maximize space by choosing vertical layouts that support sturdy growth without overhang. Plan to pair lightweight frames with drought-tolerant species for low maintenance and reliable green cover.
- Install modular panels for quick reconfiguration
- Use trellises that anchor to walls and railings
- Pick compact vines and perennials suited for containers
- Integrate drip irrigation to sustain indoor gardens and living walls
- Rotate plants seasonally to preserve vigor and shape
This approach keeps traffic open, reduces soil fatigue, and maintains a crisp silhouette. Prioritize sturdy mounting, water management, and sun exposure to sustain year-round color and texture.
Tall Yet Compact Plants
Think otherwise: slender columnar trees, upright grasses, and miscanthus varieties that stay tidy with regular pruning. Position tall plants near edges to create height without blocking walkways, and tuck compact shrubs along borders to form layered texture.
Consider root depth and container size to prevent tipping and ensure steady growth. Use a consistent color palette—deep greens with seasonal bloom accents—to keep the look cohesive.
Regularly monitor sunlight exposure and water needs, pruning lightly after flowering to maintain clean lines. This approach delivers balcony-scale drama without crowding your layout.
Trellis Tomato Techniques
With a plan for upward growth already in mind, trellis tomatoes let you add height without occupying extra ground space. You’ll optimize space by choosing compact varieties and attaching stakes or a sturdy trellis to a wall or balcony railing.
Train vines early, guiding main stems with soft ties, and prune suckers to maintain airflow and reduce disease risk. Regularly monitor sun exposure and water needs, adjusting as the plant grows.
- Select space-saving, determinate or indeterminate varieties suited for containers
- Use a tall trellis or wall-mounted grid to maximize vertical reach
- Employ consistent container pruning to balance growth and fruit production
- Implement drip irrigation or precise watering to prevent edema and rot
- Rotate crops seasonally for urban gardening efficiency and soil health
Vertical Planters and Herb Walls for Flavor and Ease
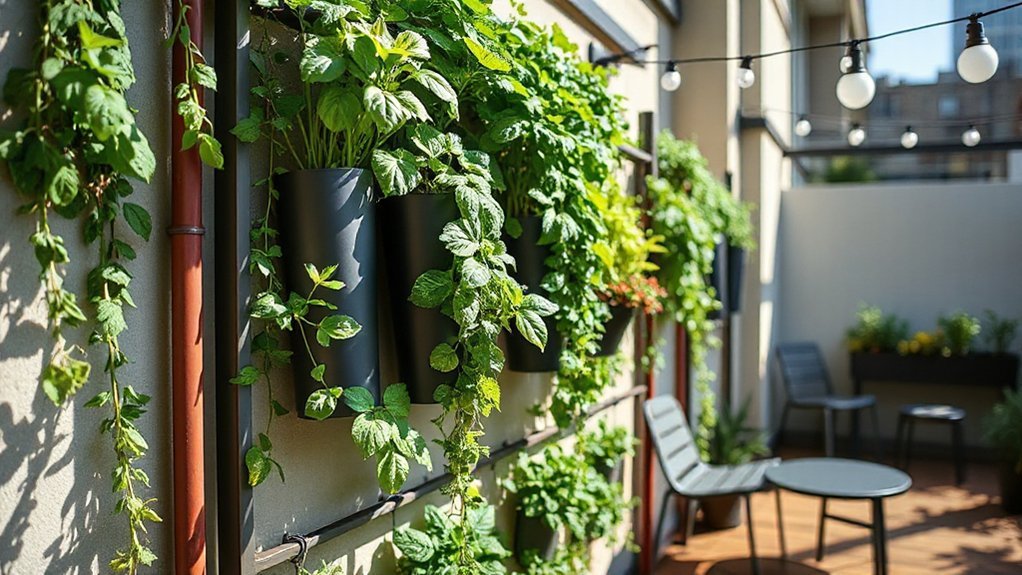
If you’re short on ground space but crave fresh herbs, vertical planters let you grow a surprising amount in a compact footprint. Choose modular systems or wall-mounted pockets to maximize airflow and sunlight exposure.
Place heavier containers lower and keep a stable base to prevent tipping. Use a drip-irrigation line or self-watering inserts to reduce daily watering and maintain consistent moisture for culinary herbs.
Install a simple trellis behind the planters to support climbing varieties and diversify your herb selection without crowding. Label each zone with a durable marker and rotate crops seasonally to prevent pests and disease buildup.
In urban gardening, plan for accessibility: keep tools nearby, water sources within reach, and harvest along the edges to avoid disturbing new growth.
Zone-by-Zone Layouts for Turnkey Small Patios
A zone-by-zone layout keeps a turnkey small patio organized and usable from day one. You’ll assign purpose to each area, then layer in Outdoor art and privacy screens to define zones without crowding sightlines.
Start with a seating enclave, add a compact dining corner, and reserve a micro-culinary strip for prep near the door. Use multiuse furniture to maximize flexibility and minimize clutter.
Weather-ready textiles pull color into every zone, while lighting ensures usability after dark. Plan traffic flow to avoid cross-paths and keep service zones clear.
- Define a primary seating zone with modular furniture
- Add a dining nook close to the door for convenience
- Integrate privacy screens to create intimate micro-areas
- Use Outdoor art as focal points for each zone
- Choose compact, weatherized storage to stay clutter-free
How to Budget-Smart Upgrades for Year-Round Usability
Year-round usability doesn’t have to break the bank. To maximize value, map a simple upgrade plan focused on durability, comfort, and energy savings.
Begin with insulation and weatherproofing: seal gaps, add door sweeps, and choose insulated curtains or panels for temperature control.
Budget-friendly lighting, like warm LEDs and solar accents, extends usable hours without spikes in bills.
Prioritize multi-season comfort: a compact heat source, space heaters, or a reversible ceiling fan with a heater option can redefine usability beyond summer.
Embrace DIY upgrades when you’re comfortable, cutting costs while preserving quality.
Save time by batching tasks—measure, source, and install in sequence.
Finally, track costs and expected returns, so every dollar advances year-round enjoyment.
Quick-Start Mini-Plans: Your Patio in 1 Weekend
Ever wondered how to transform a patio in just one weekend without turning it into a DIY marathon? You can, by following quick-start mini-plans that respect design principles and boost patio aesthetics.
Start with a focused layout, then source modular pieces you can assemble in a day. Measure, mark, and pre-assemble off-site where possible to avoid backtracking.
- Map a simple zone plan: seating, cooking, and shade
- Choose durable, low-maintenance materials
- Pick a cohesive color palette aligned with design principles
- Pre-cut or pre-assemble furniture for speedy setup
- Add lighting and plant placement to frame the space
With clear steps, you’ll finish fast, stay within budget, and enjoy a more usable patio that looks intentional.
Frequently Asked Questions
How to Measure for Compact vs. Oversized Furniture Fits?
To measure for compact vs. oversized furniture fits, start with your patio’s usable area and clear movement paths. Use a ruler or tape to mark furniture footprints, then test with scaled templates you can move.
Focus on furniture placement and space optimization by allowing at least 3 feet of circulation around seating. Consider door swing and grill or planter zones.
Choose modular pieces for flexibility, and verify fits in both sunny and shaded spots.
Which Storage Options Are Weatherproof and Maintenance-Free?
Don’t put all your eggs in one basket—weatherproof solutions exist. You want weather resistant cushions that stay comfy year-round and maintenance free shelving you can trust.
Look for high-grade resin or powder-coated metal with tight seals, UV protection, and rust resistance.
Choose modular, stackable designs for flexibility.
Opt for sealed, watertight storage chests with gaskets, plus magnetic rain guards.
You’ll enjoy durable, low-effort organization you can count on, season after season.
Can Lighting Be Integrated With Existing Outdoor Outlets?
Yes, you can. For outdoor electrical, guarantee outlets are weatherproof, GFCI-protected, and rated for outdoor use.
Use outdoor-rated lighting fixtures compatible with the existing outlets, and plan for separate circuits to avoid overloads.
Install lighting integration via switched or dimmed controls, weatherworthy cable routing, and protective conduit where needed.
Verify wiring depth, outdoor box spacing, and code compliance, then test under load.
This setup keeps illumination reliable and safe while you entertain.
What Is the Best Budget Split for Multi-Season Use?
You should allocate your budget with a clear split: 60% to seasonal planning and 40% to durable, multi-season features. This budget allocation lets you invest in weather-resistant furniture, lighting, and insulation, while reserving funds for off-peak upgrades.
Plan around activities you’ll repeat across seasons, then adjust as needed. Keep receipts and track ROI.
Revisit quarterly to refine your budget allocation, ensuring comfort, durability, and usability year-round.
How to Choose Durable Fabrics for High-Traffic Patios?
Durability dictates design: choose dense, tight-weave fabrics, treat with UV inhibitors, and select fade-resistant colors for high-traffic patios.
You’ll want sun protection from fabrics with high UPF ratings and return to abrasion-resistant blends in outdoor-ready fibers.
Watch for mildew resistance, colorfastness, and easy cleaning. Sun protection matters; fabric cleaning matters.
Stay practical, strategic, and precise: measure spans, rotate cushions, store seasonal fabrics, and sanitize spills promptly to keep patterns pristine and pliable.
Conclusion
You’ve got the framework to transform a tight patio into a true extension of your home. Start with smart storage, nest compact seating, and layer lighting for safety and mood. Add shade, weatherproof textiles, and vertical planters to cut clutter and boost usability. Zone your space, plan budgets smartly, and test a quick weekend makeover. Do this, and your patio will feel bigger, comfier, and more powerful than a full-blown outdoor living room—be prepared to be amazed.